When it comes to kitchen tools, few are as essential—and as often misunderstood—as the serrated knife. Whether you’re slicing through a crusty loaf of sourdough, carving a ripe tomato without crushing it, or tackling a tough-skinned fruit like a mango, a sharp serrated knife is indispensable. Yet, despite their importance in daily cooking, many home cooks avoid sharpening their serrated knives altogether, believing it’s too complex, risky, or simply unnecessary. This hesitation often leads to frustration in the kitchen, damaged ingredients, and even safety hazards. A dull serrated knife doesn’t just perform poorly—it can slip and cause injury, especially when you’re applying extra pressure to cut through tough textures.
That’s where this comprehensive guide comes in. Whether you’re a home cook, an aspiring chef, or someone who simply wants to maintain their kitchen tools properly, this article will equip you with everything you need to know about sharpening serrated knives at home. We’ll walk you through the tools, techniques, and best practices to restore your knife’s edge safely and effectively—no professional training required. From understanding the anatomy of a serrated blade to choosing the right sharpening method, we’ll cover it all in clear, actionable detail. By the end of this guide, you’ll not only feel confident sharpening your own serrated knives but also understand why regular maintenance is key to extending their lifespan and performance.
The market today offers a wide range of sharpening solutions—from handheld ceramic rods and diamond-coated files to electric sharpeners and guided systems—but not all are suitable for serrated blades. Many popular sharpeners are designed for straight-edged knives and can actually damage serrations if used incorrectly. That’s why it’s crucial to know what to look for and how to use the right tools properly. This guide cuts through the confusion, offering expert-backed advice on the best methods, common pitfalls, and budget-friendly options. Whether you’re working with a $20 bread knife or a high-end Japanese serrated utility blade, the principles remain the same: precision, patience, and the right technique.

What to Look for When Buying Buying Guide
1. Budget & Price Range
When it comes to sharpening serrated knives at home, your budget plays a significant role in determining which tools and methods are accessible to you. Sharpening solutions range from under $10 for basic ceramic rods to over $200 for advanced electric systems with multiple stages and precision guides. While it’s tempting to go for the cheapest option, especially if you’re new to knife maintenance, investing in a quality tool can save you time, frustration, and even money in the long run by preserving your knives instead of replacing them prematurely.
Entry-level options like ceramic honing rods or small diamond files are affordable and effective for light touch-ups, but they may lack the durability or precision needed for consistent results. Mid-range tools, such as guided sharpening systems with interchangeable rods or manual pull-through sharpeners designed for serrated edges, offer a good balance of performance and value. These typically cost between $30 and $80 and are ideal for most home cooks. Premium systems, often used by professionals or serious enthusiasts, include features like angle guides, multiple grit stages, and ergonomic designs that ensure accuracy and repeatability.
It’s also important to consider the long-term cost of ownership. A $50 sharpener that lasts five years and keeps your knives in top condition is a better investment than a $15 tool that breaks after a few uses or damages your blades. Additionally, some sharpeners require replacement rods or stones over time, so factor in ongoing maintenance costs. If you own multiple serrated knives or use them frequently, spending a bit more upfront can pay off in performance and longevity.
2. Performance Specifications
Not all sharpening tools are created equal, especially when it comes to serrated knives. Performance specifications such as grit level, rod material, angle consistency, and sharpening speed directly impact how well your knife will perform after sharpening. For serrated blades, which have small, scalloped edges (called “teeth” or “serrations”), precision is paramount. A tool that can’t reach into the narrow valleys between serrations or maintain a consistent angle will leave some teeth dull while over-sharpening others.
Grit level refers to the coarseness of the abrasive surface. Lower grit numbers (e.g., 200–400) are coarse and used for repairing chips or reshaping damaged edges, while higher grits (800–3000+) are finer and used for polishing and refining. For most home serrated knife maintenance, a medium grit (around 600–1000) is ideal for regular sharpening. Some tools come with dual-grit rods or interchangeable tips, allowing you to start with a coarser grit and finish with a finer one for a razor-sharp edge.
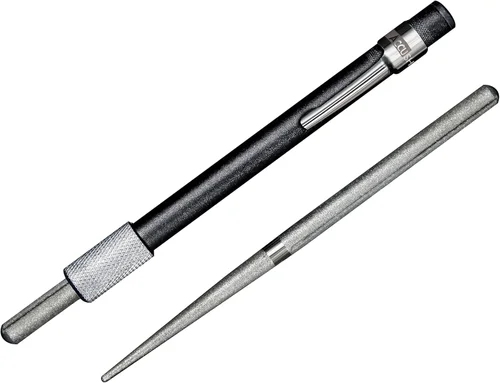
Rod material is another critical factor. Ceramic rods are popular for their durability and fine-grit finish, making them excellent for honing and light sharpening. Diamond-coated rods are harder and more aggressive, ideal for restoring heavily dulled or damaged serrations. However, diamond rods can be too harsh if used improperly, potentially removing too much metal. Tungsten carbide tips, often found in pull-through sharpeners, are effective but may not offer the same level of control as manual rods.
Angle consistency is especially important for serrated knives because each tooth must be sharpened at the same angle to maintain even performance. Tools with built-in angle guides or V-shaped slots help ensure uniformity. Some advanced systems allow you to adjust the angle based on your knife’s original bevel, which is typically between 15° and 20° per side for serrated blades. Finally, consider sharpening speed. Manual tools require more time and effort but offer greater control, while electric sharpeners are faster but may generate heat that can damage the blade’s temper if not used carefully.
3. Build Quality & Durability
The build quality of your sharpening tool directly affects its effectiveness, safety, and lifespan. A flimsy or poorly constructed sharpener can break during use, damage your knife, or fail to deliver consistent results. When evaluating build quality, look for materials like stainless steel, high-grade aluminum, or reinforced polymers that resist corrosion and wear. The handles should be ergonomic and provide a secure grip, especially when applying pressure during sharpening.
For manual sharpeners, check the stability of the rod or guide system. A wobbly or loose rod can lead to uneven sharpening and frustration. Some models feature locking mechanisms or weighted bases to keep the tool steady during use. Electric sharpeners should have sturdy housings and well-sealed motors to prevent debris from entering internal components. Additionally, inspect the quality of the abrasive surfaces—ceramic rods should be smooth and free of cracks, while diamond coatings should be evenly applied without flaking.
Durability also extends to how well the tool holds up over time. A sharpener that loses its effectiveness after a few uses is not worth the investment. Read user reviews to see how the product performs after months or years of regular use. Tools with replaceable parts, such as detachable rods or stones, offer better long-term value. For example, some ceramic rods can be replaced individually, extending the life of the entire system. Similarly, electric sharpeners with removable sharpening modules make cleaning and maintenance easier.
Another aspect of build quality is safety. Sharp edges and high-speed motors can pose risks if the tool isn’t designed with user protection in mind. Look for features like non-slip bases, finger guards, and automatic shut-off mechanisms in electric models. For manual tools, ensure that the handle provides enough leverage without requiring excessive force, which could lead to slips or strain.
4. Features & Functionality
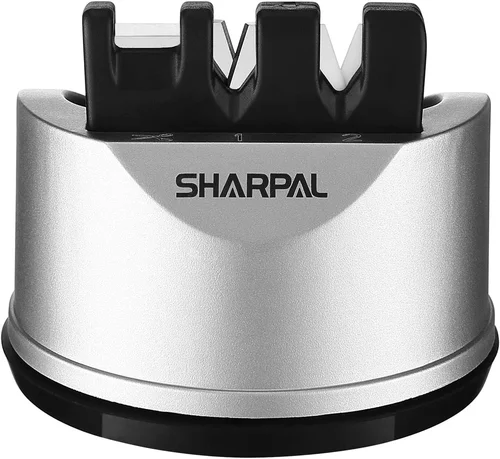
Modern sharpening tools come with a variety of features designed to make the process easier, faster, and more effective. When choosing a sharpener for serrated knives, prioritize functionality that enhances precision and convenience. One of the most important features is a dedicated slot or guide for serrated blades. Unlike straight-edged knives, serrated blades require sharpening only the beveled side of each tooth, not the flat side. A tool with a narrow, V-shaped slot or a flexible rod that can conform to the curve of each serration is essential.
Some sharpeners offer multiple stages—coarse, medium, and fine—allowing you to repair, sharpen, and polish your blade in one session. This is particularly useful if your knife has nicks or is significantly dull. Others include built-in angle guides that help you maintain the correct sharpening angle for each tooth. Adjustable angle settings are a bonus, especially if you own knives with different bevel angles. For example, European-style serrated knives often have a 20° angle, while Japanese versions may be as low as 15°.
Portability is another functional consideration. If you travel frequently or want to sharpen knives in different locations (e.g., at a campsite or outdoor kitchen), a compact, lightweight sharpener is ideal. Some manual tools fold or disassemble for easy storage. On the other hand, if you’re sharpening multiple knives at home, a larger, stationary system with a stable base may be more practical.
Additional features like LED lights, cleaning brushes, or storage cases can enhance usability. An LED light helps illuminate the serrations, making it easier to see which teeth have been sharpened. A cleaning brush removes metal particles and debris from the blade and sharpener, maintaining performance and hygiene. A protective case keeps the tool safe when not in use and makes it easy to transport.
Finally, consider ease of cleaning and maintenance. Sharpening generates metal dust and residue that can build up over time. Tools with removable parts or washable components are easier to keep clean. Electric sharpeners should have accessible chambers that can be wiped down or rinsed (if water-resistant). Avoid models with sealed units that trap debris, as this can reduce efficiency and lead to overheating.
5. Brand Reputation
When investing in a sharpening tool, especially one as specialized as a serrated knife sharpener, brand reputation matters. Established brands with a history of producing high-quality kitchen tools are more likely to offer reliable, well-designed products backed by customer support and warranties. Brands like Chef’sChoice, Work Sharp, Lansky, and Kyocera have built strong reputations for precision, innovation, and durability in the knife care industry.
Reputable brands often invest in research and development to create tools that meet the specific needs of different knife types. For example, Chef’sChoice offers electric sharpeners with dedicated serrated blade slots and advanced angle guidance, while Lansky provides modular manual systems with interchangeable rods for various grits and blade styles. These companies also tend to provide detailed user manuals, video tutorials, and responsive customer service, which can be invaluable when you’re learning how to sharpen serrated knives properly.
On the other hand, lesser-known or generic brands may cut corners on materials, design, or quality control. While they might offer lower prices, the risk of receiving a defective or ineffective product is higher. Reading customer reviews on trusted platforms like Amazon, Wirecutter, or cooking forums can help you gauge real-world performance. Look for patterns in feedback—consistent praise for ease of use or complaints about broken parts can guide your decision.
Brand reputation also extends to ethical practices and sustainability. Some companies prioritize eco-friendly materials, recyclable packaging, or fair labor practices. If these values align with your own, they can be a deciding factor. Additionally, well-known brands are more likely to honor warranties and offer replacement parts, ensuring your investment is protected long-term.
6. Warranty & Support
A solid warranty and reliable customer support are indicators of a manufacturer’s confidence in their product—and your peace of mind as a buyer. Most reputable sharpening tools come with a warranty ranging from one to five years, covering defects in materials and workmanship. Some brands even offer lifetime warranties on certain models, especially for manual sharpeners with replaceable components.
When reviewing warranty terms, pay attention to what’s covered and what’s not. For example, normal wear and tear, misuse, or damage from improper use may be excluded. Electric sharpeners often have shorter warranties due to the complexity of their motors and electronics. Make sure you understand the return process, whether you need to ship the item back, and if there are any restocking fees.
Customer support is equally important. If you run into issues—whether it’s a broken part, unclear instructions, or questions about technique—responsive support can make all the difference. Look for brands that offer multiple contact methods (phone, email, live chat) and have helpful resources like FAQs, video guides, or troubleshooting tips on their websites. Some companies even provide free sharpening consultations or blade assessments.
For international buyers, check if the warranty is valid globally or only in specific regions. Also, consider whether the company offers local repair services or authorized dealers in your area. This can save time and shipping costs if repairs are needed.
7. Size & Portability
The size and portability of your sharpening tool depend on how and where you plan to use it. If you’re sharpening knives at home, a larger, stationary system may be perfectly fine. However, if you’re a frequent traveler, outdoor cook, or someone who likes to maintain tools on the go, a compact, lightweight option is essential.
Manual sharpeners, especially those with folding or detachable rods, are generally more portable than electric models. Some are small enough to fit in a kitchen drawer, toolbox, or even a backpack. Electric sharpeners, while convenient, are bulkier and require a power source, limiting their use outside the home. However, newer models are becoming more compact and energy-efficient, with some offering battery operation or USB charging.
Consider the storage space you have available. A sharpener that takes up too much counter space may become a nuisance, especially in small kitchens. Wall-mounted or drawer-mounted systems can save space while keeping the tool easily accessible. Some models come with built-in storage for extra rods or accessories, reducing clutter.
Portability also affects ease of use. A tool that’s too small may lack stability, while one that’s too large can be cumbersome. Look for a balance between size and functionality. For example, a handheld ceramic rod with a comfortable grip is ideal for quick touch-ups, while a larger guided system is better for thorough sharpening sessions.
8. User Reviews & Ratings
Before making a purchase, always consult user reviews and ratings from verified buyers. These provide real-world insights into how a product performs under everyday conditions. Look for detailed reviews that mention specific features, ease of use, durability, and results on serrated knives. Pay attention to both positive and negative feedback to get a balanced perspective.
High ratings (4.5 stars and above) are generally a good sign, but read beyond the stars. A product with 1,000 reviews and a 4.7 average is more trustworthy than one with 10 reviews and a 5.0. Check for recurring themes—multiple users praising the tool’s precision or complaining about broken parts can guide your decision. Also, look for reviews from people who own similar knives to yours, as results can vary based on blade type and condition.
Platforms like Amazon, Best Buy, and specialty kitchen stores often feature video reviews, which can show the tool in action. These are especially helpful for understanding how to use the sharpener correctly. Additionally, forums like Reddit’s r/knives or cooking communities on Facebook can provide honest, unfiltered opinions from experienced users.
Different Types of Buying Guide

Common Buying Mistakes to Avoid
❌ Mistake: Using a Standard Sharpener on Serrated Blades
Why it’s bad: Most standard sharpeners are designed for straight-edged knives and have wide slots or flat stones that can’t reach into the narrow serrations. Using them on serrated knives often results in uneven sharpening, damaged teeth, or even broken blades.
What to do instead: Always use a sharpener specifically designed for serrated knives, such as one with narrow rods, V-slots, or flexible guides that can conform to each tooth.
❌ Mistake: Sharpening Both Sides of the Blade
Why it’s bad: Serrated knives are only sharpened on the beveled (curved) side of each tooth. Sharpening the flat side can ruin the blade’s geometry and reduce cutting performance.
What to do instead: Focus only on the beveled edge of each serration. Use a rod or file that fits snugly into the curve and glide it along the edge in one direction.
❌ Mistake: Applying Too Much Pressure
Why it’s bad: Excessive force can wear down the blade unevenly, create burrs, or even snap delicate serrations. It also increases the risk of injury.
What to do instead: Use light, consistent pressure. Let the abrasive do the work—gentle strokes are more effective and safer.
❌ Mistake: Ignoring Angle Consistency
Why it’s bad: If each tooth is sharpened at a different angle, the knife will cut unevenly, with some teeth biting deeper than others.
What to do instead: Use a guided system or practice maintaining a consistent angle. Mark the first tooth as a reference to ensure uniformity.
❌ Mistake: Over-Sharpening
Why it’s bad: Sharpening too frequently or too aggressively removes excess metal, shortening the knife’s lifespan and potentially altering its shape.
What to do instead: Sharpen only when needed—typically every 6–12 months with regular use. Use honing for maintenance between sharpenings.
❌ Mistake: Not Cleaning the Blade First
Why it’s bad: Food residue, oils, and debris can clog the sharpener and reduce its effectiveness. It may also transfer contaminants to the blade.
What to do instead: Always wash and dry the knife thoroughly before sharpening. Clean the sharpener after each use to prevent buildup.
❌ Mistake: Skipping the Honing Step
Why it’s bad: Honing realigns the edge between sharpenings and keeps the knife performing well. Skipping it leads to faster dulling.
What to do instead: Use a honing rod or steel regularly (weekly or after heavy use) to maintain the edge between full sharpenings.
Budget Guidelines: How Much Should You Spend?
- Entry-Level ($10 – $30): Ideal for occasional use or light maintenance. Includes basic ceramic rods or small diamond files. Best for touch-ups but may lack precision for full sharpening.
- Mid-Range ($30 – $80): The sweet spot for most home cooks. Offers guided systems, dual-grit rods, or pull-through sharpeners with serrated slots. Balances performance, durability, and affordability.
- Premium ($80 – $150): For enthusiasts and frequent users. Features advanced angle control, multiple stages, and high-quality materials. Delivers professional results with minimal effort.
- Luxury ($150+): Top-tier electric systems or custom sharpening kits. Includes precision guides, digital angle readouts, and lifetime warranties. Best for collectors, chefs, or those who demand perfection.

Expert Tips for Getting the Best Deal
- Buy during seasonal sales: Look for discounts during Black Friday, Amazon Prime Day, or kitchenware clearance events.
- Compare retailers: Check prices on Amazon, Williams Sonoma, Bed Bath & Beyond, and specialty knife shops. Some offer price matching.
- Read the fine print: Check return policies, warranty terms, and shipping costs before purchasing.
- Buy bundles: Some brands offer sharpeners with extra rods, cases, or cleaning tools at a discounted rate.
- Test before committing: If possible, try a friend’s sharpener or visit a store to handle the tool in person.
- Consider refurbished models: Certified refurbished sharpeners from reputable brands can save 20–40% and often come with warranties.
- Join loyalty programs: Sign up for newsletters or rewards programs to receive exclusive discounts and early access to sales.

Frequently Asked Questions
Q: Can I sharpen a serrated knife with a regular whetstone?
A: Not effectively. Whetstones are flat and can’t reach into the curved serrations. You’d need a round stone or rod that matches the shape of each tooth, which is impractical for most home users.
Q: How often should I sharpen my serrated knife?
A: It depends on usage. For daily use, sharpen every 6–12 months. For occasional use, once a year may suffice. Hone weekly to maintain the edge.
Q: Will sharpening remove the serrations?
A: No, if done correctly. Sharpening only affects the beveled edge of each tooth, not the overall shape. Over-sharpening or using the wrong tool can damage serrations, though.
Q: Can I use an electric sharpener on a serrated knife?
A: Only if it has a dedicated serrated blade slot. Many electric sharpeners do, but always check the manual to avoid damage.
Q: What’s the difference between sharpening and honing?
A: Sharpening removes metal to create a new edge, while honing realigns the existing edge without removing material. Both are important for knife maintenance.
Q: Can I sharpen a serrated knife by hand without tools?
A: Technically yes, but it’s extremely difficult to maintain consistency. Using a proper tool ensures even results and protects the blade.
Q: Are serrated knives harder to sharpen than straight-edged knives?
A: They require more precision due to the individual teeth, but with the right tool and technique, it’s manageable for most home cooks.
Q: What if my serrated knife has chips or nicks?
A: Use a coarse-grit diamond file or a sharpening system with a repair stage. Lightly file each damaged tooth until the chip is removed, then refine with a finer grit.
Q: Can I sharpen a ceramic serrated knife?
A: Yes, but only with a diamond-coated tool. Ceramic blades are extremely hard and require diamond abrasives for effective sharpening.
Q: Is it worth sharpening an inexpensive serrated knife?
A: If the blade is still in good condition, yes. Sharpening can restore performance and extend its life. However, if the knife is warped or heavily damaged, replacement may be better.
Our Final Recommendations
- Best for Budget-Conscious Buyers: Kyocera Advanced Ceramic Sharpener – Affordable, durable, and perfect for light maintenance.
- Best Overall Value: Lansky Turnbox Pro – Compact, guided system with interchangeable rods for precise sharpening.
- Best Premium Option: Chef’sChoice Trizor XV – Electric sharpener with dedicated serrated slot and 15° angle for professional results.
- Best for Beginners: Work Sharp Guided Field Sharpener – Easy to use, portable, and includes angle guides for consistency.
- Best for Advanced Users: Edge Pro Apex 4 – Modular system with customizable angles and high-precision sharpening for enthusiasts.
Conclusion: Making the Right Choice
Sharpening a serrated knife at home doesn’t have to be intimidating. With the right tools, techniques, and knowledge, you can keep your bread knife, tomato slicer, or utility blade performing like new for years. This guide has walked you through every aspect of the process—from understanding key factors like budget and build quality to avoiding common mistakes and choosing the best sharpener for your needs.
Remember, the goal isn’t perfection on the first try—it’s progress. Start with a mid-range tool, practice on an old knife, and build your confidence over time. Regular maintenance, including honing and proper storage, will go a long way in preserving your knife’s edge and performance. Whether you’re a casual cook or a dedicated foodie, investing in your tools is investing in your culinary experience.
So don’t let a dull serrated knife slow you down. Take action today—choose the right sharpener, follow the steps in this guide, and enjoy the satisfaction of slicing through crusty bread or ripe tomatoes with ease. Your kitchen—and your taste buds—will thank you.