Keeping the bottom of your electric kettle clean is essential for safety, efficiency, and longevity. Over time, mineral buildup and grime can accumulate on the heating element and base, reducing performance and potentially causing damage. With the right tools and techniques, you can easily restore your kettle to peak condition.
Key Takeaways
- Regular cleaning prevents limescale buildup: Hard water leaves mineral deposits that reduce heating efficiency and can damage the kettle over time.
- Use natural cleaners like vinegar or lemon: These are safe, effective, and eco-friendly alternatives to harsh chemicals.
- Never submerge the base in water: The electrical components must stay dry to avoid short circuits or electric shock.
- Clean both the interior and exterior heating plate: Focus on the bottom where residue accumulates from spills and mineral deposits.
- Unplug before cleaning: Always disconnect the kettle from power to ensure safety during maintenance.
- Use a soft cloth or brush: Avoid abrasive materials that can scratch the surface or damage the heating element.
- Maintain your kettle monthly: Consistent care keeps it working efficiently and extends its lifespan.
📑 Table of Contents
- Why Cleaning the Bottom of Your Electric Kettle Matters
- Understanding the Anatomy of an Electric Kettle Base
- Signs Your Kettle’s Bottom Needs Cleaning
- Step-by-Step Guide: How to Clean Bottom of Electric Kettle
- Natural Cleaning Solutions for Tough Buildup
- Safety Tips and Common Mistakes to Avoid
- Maintaining Your Kettle for Long-Term Performance
- Conclusion
Why Cleaning the Bottom of Your Electric Kettle Matters
If you’ve ever noticed your electric kettle taking longer to boil water or making strange noises, the culprit might be hiding right under the base—on the bottom. The heating element and contact points at the bottom of your electric kettle are critical to its performance, yet they’re often overlooked during routine cleaning. Over time, mineral deposits from hard water, dust, and even spilled liquids can build up on this area, creating a layer of grime that interferes with heat transfer and electrical conductivity.
This buildup doesn’t just slow down your morning coffee routine—it can also pose safety risks. A dirty heating plate may cause the kettle to overheat, trip circuit breakers, or even damage the appliance permanently. In extreme cases, residue can lead to electrical arcing or short circuits, especially if moisture seeps into the base. That’s why learning how to clean the bottom of your electric kettle isn’t just about maintenance—it’s about protecting your investment and ensuring safe, reliable operation.
Many people focus only on cleaning the inside of the kettle, scrubbing away limescale from the walls and spout. While that’s important, it’s only half the battle. The bottom, where the magic (and heat) happens, deserves equal attention. Whether your kettle has a concealed heating element or a visible coil, the base needs regular care to function efficiently. By incorporating bottom cleaning into your routine, you’ll not only improve boiling speed and energy efficiency but also extend the life of your appliance.
Understanding the Anatomy of an Electric Kettle Base
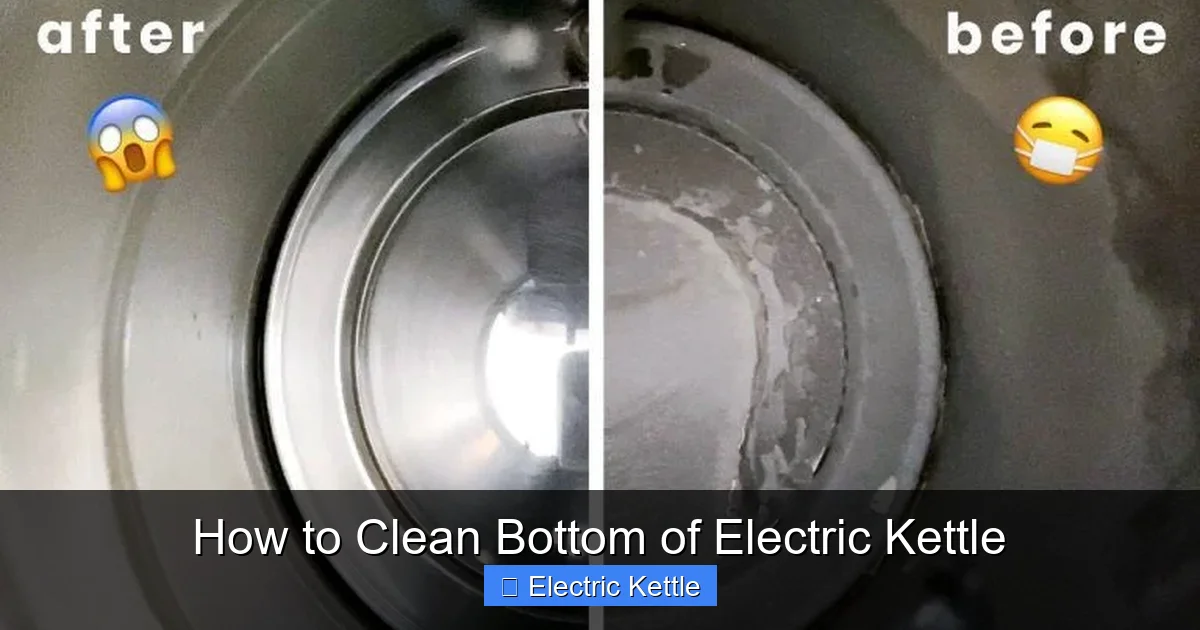
Visual guide about How to Clean Bottom of Electric Kettle
Image source: easylifeelectronic.com
Before diving into cleaning methods, it helps to understand what’s happening beneath your kettle. Most modern electric kettles have a flat, circular heating plate at the bottom—this is where the electrical energy converts into heat. This plate sits inside a protective housing that connects to the power base via metal contact points. When you place the kettle on its base, these points complete the circuit, allowing electricity to flow and heat the water.
Over time, this area collects residue from several sources. Hard water, which contains high levels of calcium and magnesium, leaves behind white, chalky limescale deposits. These minerals settle not only inside the kettle but also on the heating plate and around the rim where water splashes during boiling. Additionally, dust, kitchen grease, and dried liquid spills can coat the exterior bottom, creating a sticky film that traps heat and reduces efficiency.
Some kettles have a fully enclosed heating element, making the bottom appear smooth and seamless. Others, especially older models, may have a visible spiral coil. Regardless of design, the principle is the same: heat must transfer efficiently from the element to the water. Any barrier—whether mineral scale, grease, or debris—interferes with this process. That’s why even a thin layer of buildup can significantly impact performance.
It’s also important to note that the electrical contacts on the base are sensitive. These small metal discs or pins must remain clean and dry to ensure a solid connection. Corrosion or grime here can cause intermittent power, flickering lights, or complete failure to heat. In short, the bottom of your electric kettle is a high-traffic zone for both heat and electricity—keeping it clean is essential for smooth operation.
Signs Your Kettle’s Bottom Needs Cleaning
How do you know it’s time to clean the bottom of your electric kettle? While some signs are obvious, others are more subtle. Paying attention to your kettle’s behavior can help you catch problems early, before they lead to bigger issues.
One of the most common indicators is slower boiling times. If your kettle used to boil water in three minutes but now takes five or six, mineral buildup on the heating plate could be to blame. The scale acts as an insulator, reducing the amount of heat that reaches the water. You might also notice that the kettle shuts off before the water reaches a full boil, especially if the thermostat detects uneven heating.
Another red flag is unusual noises during operation. A clean heating element should heat water quietly and evenly. If you hear popping, crackling, or sizzling sounds—especially near the base—it could mean that trapped moisture or debris is reacting to the heat. In some cases, you might even see small sparks or notice a burning smell, which signals that electrical components are overheating or shorting out.
Visible residue is another clear sign. Lift your kettle and inspect the bottom. Do you see white, flaky deposits around the edges or on the heating plate? Is there a sticky film or dark smudges from spills? These are all signs that cleaning is overdue. Even if the kettle still works, ignoring these signs can lead to permanent damage or reduced efficiency over time.
Finally, pay attention to how the kettle sits on its base. If it wobbles, doesn’t make full contact, or the power light flickers when you place it down, the issue might be debris or corrosion on the contact points. A clean, flat surface ensures proper alignment and electrical connection. If your kettle feels unstable or inconsistent, it’s time for a thorough bottom cleaning.
Step-by-Step Guide: How to Clean Bottom of Electric Kettle
Cleaning the bottom of your electric kettle is simpler than you might think—and it only takes a few minutes. The key is to use the right tools and techniques to remove buildup without damaging sensitive components. Here’s a safe, effective method you can follow at home.
Gather Your Supplies
Before you begin, make sure you have everything you need. You’ll want to work in a clean, dry area with good lighting. Here’s what to gather:
– White vinegar or lemon juice (natural descaling agents)
– Soft microfiber cloths or non-abrasive sponges
– Cotton swabs or an old toothbrush (for tight spaces)
– Distilled water (to rinse and prevent new mineral deposits)
– A small bowl or container
– Rubber gloves (optional, for protection)
Avoid using steel wool, scouring pads, or harsh chemical cleaners, as these can scratch the surface or leave toxic residues.
Unplug and Cool Down
Safety first! Always unplug your kettle from the power outlet and let it cool completely before cleaning. Even if the kettle feels warm, residual heat can cause burns or damage cleaning materials. Never attempt to clean a plugged-in or hot kettle—this is a major safety hazard.
Clean the Exterior Bottom
Start by wiping the outside of the kettle’s base. Use a damp microfiber cloth to remove dust, grease, or dried spills. For stubborn grime, dampen the cloth with a mixture of equal parts water and white vinegar. Gently rub the surface in circular motions, paying extra attention to the edges and around the contact points.
If there’s sticky residue, let the vinegar solution sit for a few minutes before wiping. For tight spots around the rim or between grooves, use a cotton swab dipped in the cleaning solution. Avoid getting liquid into any openings or seams—moisture can damage internal components.
Once the exterior is clean, wipe it dry with a clean, dry cloth. Make sure no moisture remains, especially around the electrical contacts.
Descale the Heating Plate
Now it’s time to tackle the heating plate—the heart of your kettle. If you see white, chalky buildup, it’s limescale from hard water. This is best removed with a natural acid like vinegar or lemon juice.
Fill a small bowl with equal parts white vinegar and distilled water. Dip a soft cloth or sponge into the solution and gently scrub the heating plate. For heavy buildup, you can place the damp cloth directly on the plate and let it sit for 10–15 minutes to loosen the scale. Avoid soaking the area—just keep it moist.
For stubborn deposits, use an old toothbrush (soft bristles only) to gently scrub the surface. Be careful not to press too hard, as you don’t want to scratch or damage the plate. Focus on the center and edges where minerals tend to accumulate.
After scrubbing, wipe the plate with a clean, damp cloth to remove any vinegar residue. Then dry thoroughly with a dry cloth.
Rinse and Reassemble
If your kettle has a removable base or filter, take it out and rinse it under distilled water. This helps remove any lingering vinegar or loosened scale. Wipe all parts dry before reassembling.
For the main body, you can also run a quick rinse cycle: fill the kettle with distilled water, boil it, then pour it out. This helps flush out any remaining mineral particles from the interior. Repeat once if needed.
Once everything is dry and reassembled, plug the kettle back in and test it with a small amount of water. Listen for normal boiling sounds and check that the heating plate gets hot evenly.
Maintain a Cleaning Schedule
To keep your kettle in top shape, make bottom cleaning a regular habit. For most households, a monthly cleaning is sufficient. If you live in an area with very hard water, consider cleaning every two to three weeks. Regular maintenance prevents heavy buildup and keeps your kettle running efficiently.
Natural Cleaning Solutions for Tough Buildup
When it comes to cleaning the bottom of your electric kettle, you don’t need harsh chemicals. In fact, some of the most effective solutions are already in your kitchen. Natural cleaners like vinegar, lemon juice, and baking soda are safe, affordable, and eco-friendly alternatives that work wonders on limescale and grime.
Vinegar: The Ultimate Descaler
White vinegar is a powerhouse when it comes to breaking down mineral deposits. Its acetic acid content dissolves calcium and magnesium, the main components of limescale. For light buildup, a 50/50 mix of vinegar and water is usually enough. For heavier scale, you can use undiluted vinegar.
Simply soak a cloth in the solution and apply it to the heating plate. Let it sit for 10–20 minutes, then scrub gently with a soft brush or sponge. The vinegar will fizz as it reacts with the scale—this is a good sign that it’s working. After scrubbing, wipe clean and dry thoroughly.
One tip: if the vinegar smell bothers you, rinse the area with a cloth dampened with water and a few drops of lemon juice. This neutralizes the odor without leaving residue.
Lemon Juice: Fresh and Effective
Lemon juice is another excellent natural cleaner. Like vinegar, it contains citric acid, which dissolves mineral deposits and leaves a fresh scent. Cut a lemon in half and rub it directly onto the heating plate, squeezing as you go to release the juice. Let it sit for 10 minutes, then scrub with a soft cloth or brush.
For extra power, mix lemon juice with a teaspoon of baking soda to create a gentle paste. Apply it to tough spots, let it fizz, then wipe away. This combination is especially effective for greasy or sticky residue around the base.
Baking Soda for Stubborn Stains
Baking soda is a mild abrasive that’s safe for most surfaces. It’s great for scrubbing away dark smudges or burnt-on residue without scratching. Make a paste by mixing baking soda with a small amount of water. Apply it to the problem area and gently scrub with a soft cloth or toothbrush.
For best results, combine baking soda with vinegar. The reaction creates carbon dioxide bubbles that help lift dirt and scale. Just be sure to wipe away the mixture promptly to avoid leaving a gritty residue.
Preventing Future Buildup
The best cleaning is the kind you don’t have to do often. To minimize future buildup, use distilled or filtered water in your kettle whenever possible. This reduces the mineral content and slows the formation of limescale. Also, wipe the bottom of your kettle after each use to remove spills and moisture.
If you notice early signs of scale, address them immediately. A quick weekly wipe with a vinegar-dampened cloth can prevent major cleaning sessions down the line.
Safety Tips and Common Mistakes to Avoid
Cleaning the bottom of your electric kettle is generally safe, but there are a few precautions to keep in mind. A little caution goes a long way in preventing accidents and protecting your appliance.
Never Submerge the Base
This cannot be stressed enough: never, ever submerge the base of your electric kettle in water. The electrical components are not waterproof, and immersion can cause short circuits, electric shock, or permanent damage. Even splashing water into the base can be dangerous. Always clean with a damp cloth—not a soaked one—and wipe dry immediately.
Unplug Before Cleaning
Always disconnect the kettle from the power source before cleaning. Even if the kettle is off, it can still carry a charge. Unplugging ensures there’s no risk of electric shock, especially when handling wet cloths or cleaning solutions.
Avoid Harsh Chemicals
While commercial descaling products are available, many contain strong acids or chemicals that can damage the kettle’s finish or leave toxic residues. Stick to natural cleaners like vinegar and lemon juice, which are safe and effective. If you do use a commercial product, read the label carefully and rinse thoroughly.
Don’t Use Abrasive Tools
Steel wool, scouring pads, or harsh brushes can scratch the heating plate or remove protective coatings. These scratches not only look bad but can also trap bacteria and make future cleaning harder. Stick to soft cloths, sponges, or toothbrushes with soft bristles.
Let the Kettle Cool Completely
Cleaning a hot kettle is dangerous. The heating element can remain hot for several minutes after use, and applying liquid to a hot surface can cause cracking or steam burns. Always wait until the kettle is cool to the touch before cleaning.
Check for Damage
While cleaning, take a moment to inspect the bottom for cracks, burns, or corrosion. If you notice any damage, stop using the kettle and consider replacing it. Damaged components can be a fire or shock hazard.
Maintaining Your Kettle for Long-Term Performance
Cleaning the bottom of your electric kettle isn’t a one-time task—it’s part of an ongoing maintenance routine that keeps your appliance running smoothly for years. With a few simple habits, you can prevent buildup, improve efficiency, and avoid costly repairs.
Clean Monthly
Set a reminder to clean the bottom of your kettle once a month. This is especially important if you use your kettle daily or live in a hard water area. Regular cleaning prevents heavy scale accumulation and keeps the heating plate in top condition.
Use Filtered Water
Whenever possible, fill your kettle with filtered or distilled water. This reduces the mineral content and slows the formation of limescale. It’s a small change that makes a big difference over time.
Wipe After Use
Get in the habit of wiping the bottom of your kettle after each use. A quick swipe with a dry cloth removes moisture and prevents spills from drying into sticky residue. This simple step can cut down on deep cleaning sessions.
Store Properly
When not in use, store your kettle in a dry, cool place. Avoid stacking heavy items on top, as this can damage the base or heating plate. If you have a corded model, wrap the cord neatly to prevent tangling and wear.
Listen to Your Kettle
Your kettle will tell you when something’s wrong. If it starts taking longer to boil, making odd noises, or shutting off unexpectedly, don’t ignore it. These are signs that cleaning or repair may be needed. Addressing issues early can save you from bigger problems later.
By treating your electric kettle with care, you’ll enjoy faster boiling times, better-tasting water, and a longer lifespan. A little effort goes a long way—and your morning coffee will thank you.
Conclusion
Learning how to clean the bottom of your electric kettle is a simple but essential skill for any kitchen. While it’s easy to focus only on the interior, the base and heating plate play a crucial role in performance, safety, and longevity. Mineral buildup, grease, and debris can slow down boiling, damage components, and even pose electrical risks if left unchecked.
With the right tools and techniques—like vinegar, lemon juice, and soft cloths—you can safely and effectively remove buildup without harming your appliance. Regular cleaning, combined with smart habits like using filtered water and wiping after use, keeps your kettle in peak condition.
Don’t wait for problems to arise. Make bottom cleaning a monthly habit, and you’ll enjoy faster, safer, and more efficient boiling for years to come. Your kettle works hard for you—give it the care it deserves.
Frequently Asked Questions
Can I use vinegar to clean the bottom of my electric kettle?
Yes, white vinegar is one of the best natural cleaners for removing limescale and mineral buildup. Mix equal parts vinegar and water, apply to the heating plate with a cloth, let it sit for 10–15 minutes, then scrub gently and wipe dry.
Is it safe to clean the bottom of an electric kettle with water?
You can use a damp cloth to wipe the exterior bottom, but never submerge the base or let water seep into electrical components. Always unplug the kettle and ensure it’s completely dry before use.
How often should I clean the bottom of my electric kettle?
For most households, cleaning the bottom once a month is sufficient. If you have hard water or use your kettle heavily, consider cleaning every two to three weeks to prevent buildup.
What should I do if my kettle’s bottom has burnt-on residue?
For burnt or sticky residue, make a paste of baking soda and water, apply it to the area, and let it sit for 10 minutes. Gently scrub with a soft toothbrush, then wipe clean with a damp cloth and dry thoroughly.
Can I use commercial descaling products on the bottom of my kettle?
Some commercial descalers are safe, but always check the label to ensure they’re suitable for the base and heating plate. Natural options like vinegar and lemon are often safer and just as effective.
Why is my kettle making noise when I boil water?
Unusual noises like popping or sizzling can indicate mineral buildup or trapped moisture on the heating plate. Cleaning the bottom with vinegar or lemon juice usually resolves the issue by removing insulating scale.