Keeping your electric kettle clean ensures better-tasting water, faster boiling, and a longer appliance lifespan. Regular maintenance prevents limescale buildup, bacteria growth, and unpleasant odors—simple steps anyone can follow.
Key Takeaways
- Clean your electric kettle regularly: Aim for once a week if you use it daily to prevent mineral buildup and maintain performance.
- Use natural cleaning agents: Vinegar, lemon juice, or baking soda are safe, effective, and eco-friendly options for descaling.
- Never submerge the base: Only clean the interior and exterior surfaces—water damage to the electrical base can be dangerous.
- Rinse thoroughly after cleaning: Residual cleaning solution can affect taste and safety, so always rinse well before reuse.
- Descale based on water hardness: If you have hard water, clean more frequently—every 1–2 weeks—to avoid heavy limescale.
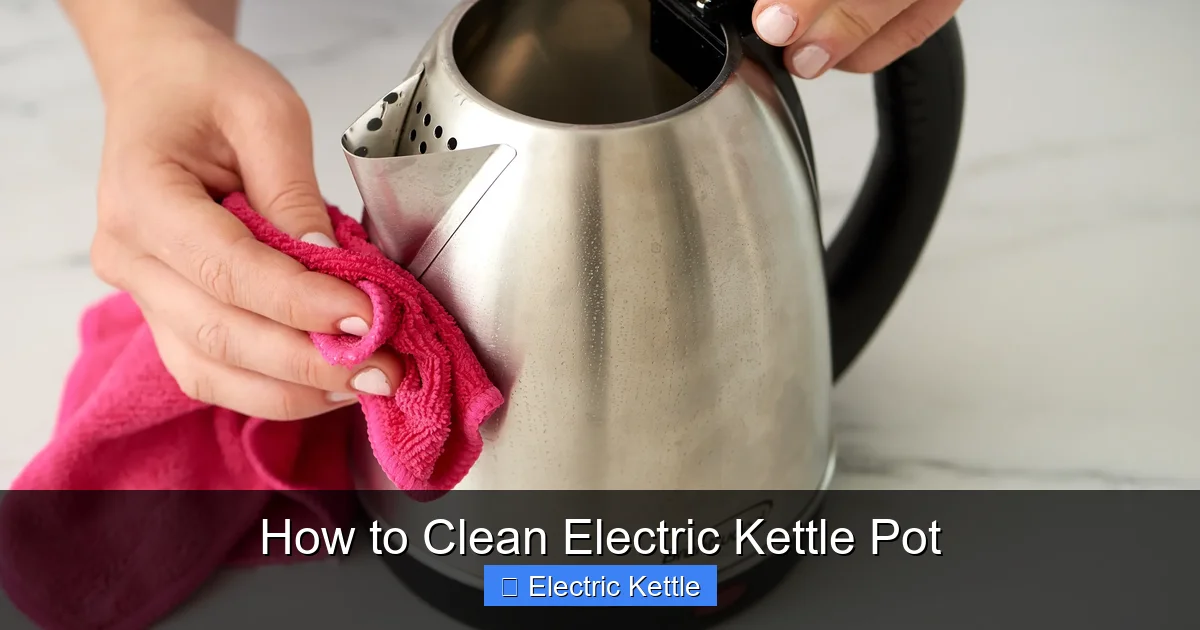
- Wipe the exterior gently: Use a damp cloth and mild soap to keep the outside shiny and free of fingerprints or stains.
- Store with the lid open: Allow air circulation to prevent musty smells and moisture buildup when not in use.
📑 Table of Contents
- Why Cleaning Your Electric Kettle Matters
- Signs Your Electric Kettle Needs Cleaning
- Essential Tools and Supplies for Cleaning
- Step-by-Step Guide to Cleaning Your Electric Kettle
- Alternative Cleaning Methods
- Tips for Maintaining a Clean Electric Kettle
- Common Mistakes to Avoid
- When to Replace Your Electric Kettle
- Conclusion
Why Cleaning Your Electric Kettle Matters
Your electric kettle is one of the most used appliances in the kitchen—especially if you’re a tea lover, coffee drinker, or someone who relies on hot water for instant meals. But did you know that even though it heats water to boiling point, your kettle can still harbor bacteria, mineral deposits, and unpleasant odors? That’s right: just because water boils doesn’t mean your kettle is clean.
Over time, minerals like calcium and magnesium from hard water accumulate inside the kettle, forming a chalky white or gray layer known as limescale. This buildup doesn’t just look unappealing—it can slow down heating, reduce efficiency, and even affect the taste of your beverages. In severe cases, limescale can damage the heating element, leading to costly repairs or the need for a replacement.
But it’s not just about minerals. Residual oils from tea or coffee, dust, and even mold can develop in the spout or under the lid if the kettle isn’t dried properly. These contaminants can create off-flavors and, in rare cases, promote bacterial growth. That’s why regular cleaning isn’t just a good habit—it’s essential for both performance and hygiene.
Cleaning your electric kettle doesn’t have to be complicated or time-consuming. With the right tools and techniques, you can keep it sparkling clean in under 30 minutes. Whether you’re dealing with light staining or heavy limescale, there’s a method that works. And the best part? You probably already have everything you need at home.
Signs Your Electric Kettle Needs Cleaning
Visual guide about How to Clean Electric Kettle Pot
Image source: cdn.apartmenttherapy.info
How do you know when it’s time to give your kettle a deep clean? While a weekly routine is ideal, certain signs indicate that your kettle is overdue for maintenance. Pay attention to these common indicators:
One of the most obvious signs is visible limescale buildup. If you notice a white, flaky residue on the heating element, inside the walls, or around the spout, it’s time to descale. This buildup not only looks dirty but also insulates the heating element, making your kettle work harder and use more energy.
Another red flag is a change in taste. If your tea or coffee starts tasting slightly metallic, chalky, or just “off,” mineral deposits or residue from old cleaning solutions could be the culprit. Even small amounts of limescale can alter the flavor of your drinks.
You might also notice that your kettle takes longer to boil water than it used to. This reduced efficiency is a classic symptom of limescale buildup, which acts as a barrier between the heating element and the water. Over time, this can lead to overheating and potential damage.
Unusual noises—like popping, cracking, or sizzling—during heating can also signal a problem. These sounds often occur when trapped air or minerals expand rapidly under heat. While occasional popping is normal, persistent noise means it’s time for a cleaning.
Finally, if you see discoloration, cloudiness in the water, or a musty smell when you open the lid, your kettle may have mold or bacterial growth. This is more common in kettles that are stored with water inside or not dried properly after use.
Don’t wait for these issues to worsen. A quick inspection every few days can help you catch problems early and keep your kettle in top condition.
Essential Tools and Supplies for Cleaning
Before you start cleaning, gather the right tools and supplies. The good news is that most of these items are already in your kitchen. You don’t need expensive cleaners or specialty equipment—just a few household staples and some basic tools.
Start with white distilled vinegar. This is the gold standard for descaling electric kettles. Its mild acidity breaks down limescale effectively without damaging the interior. You can also use lemon juice as a natural alternative—it works similarly and leaves a fresh scent.
Baking soda is another versatile cleaner. While it’s less effective on heavy limescale, it’s great for scrubbing stains, neutralizing odors, and cleaning the exterior. Combine it with water to make a paste for gentle abrasion.
You’ll also need a soft sponge or non-abrasive scrubbing pad. Avoid steel wool or harsh scouring pads, as they can scratch the interior surface, especially if your kettle has a stainless steel or coated finish. A soft-bristled brush, like an old toothbrush, is perfect for reaching tight spots like the spout or lid hinge.
For rinsing, use clean water and a microfiber cloth or paper towels. A funnel can help pour cleaning solutions into narrow openings, and a measuring cup ensures you use the right amounts.
If you prefer commercial cleaners, look for descaling solutions specifically designed for kettles. Brands like Durgol, De’Longhi, or even generic descaling powders are safe and effective. Just make sure to follow the instructions carefully and rinse thoroughly.
Lastly, always have a dry towel on hand to wipe down the exterior and base after cleaning. Remember: never submerge the electrical base in water. Only the interior and removable parts should come into contact with liquid.
Step-by-Step Guide to Cleaning Your Electric Kettle
Now that you have your supplies ready, it’s time to clean your electric kettle. Follow these simple steps to remove limescale, odors, and buildup safely and effectively.
Step 1: Empty and Rinse the Kettle
Start by unplugging the kettle and letting it cool completely if it’s been recently used. Pour out any remaining water and give the interior a quick rinse with clean water. This removes loose debris and prepares the surface for deeper cleaning.
Step 2: Prepare the Cleaning Solution
For light to moderate limescale, mix equal parts white vinegar and water. For example, use 1 cup of vinegar and 1 cup of water. If your kettle has heavy buildup, you can use undiluted vinegar. Pour the solution into the kettle, making sure it covers the affected areas—especially the heating element and bottom.
Let the solution sit for at least 30 minutes. For tough limescale, leave it overnight. The acid in the vinegar will dissolve the mineral deposits, making them easier to remove.
Step 3: Boil the Solution (Optional)
If your kettle allows it, you can speed up the process by boiling the vinegar solution. Turn on the kettle and let it run through one cycle. The heat helps break down limescale more quickly. After boiling, let the solution sit for another 15–20 minutes before proceeding.
Note: Some manufacturers advise against boiling vinegar due to the strong smell. If you’re sensitive to odors, skip this step and rely on soaking instead.
Step 4: Scrub and Rinse
After soaking, use a soft sponge or brush to gently scrub the interior. Focus on areas with visible buildup. The limescale should come off easily. For stubborn spots, dip the sponge in the vinegar solution and scrub again.
Once you’ve scrubbed, pour out the vinegar mixture and rinse the kettle thoroughly with clean water. Fill it up, swish the water around, and pour it out several times. This ensures no vinegar residue remains, which could affect the taste of your drinks.
Step 5: Neutralize Odors (If Needed)
If your kettle still smells like vinegar, fill it with clean water and add a tablespoon of baking soda. Let it sit for 10–15 minutes, then rinse again. Baking soda neutralizes odors and leaves your kettle smelling fresh.
Step 6: Clean the Exterior and Base
While the interior soaks, wipe down the exterior with a damp cloth and a drop of mild dish soap. Avoid getting water near the electrical base or cord. For stainless steel kettles, use a microfiber cloth to prevent streaks. Dry thoroughly with a clean towel.
Step 7: Final Rinse and Dry
Give the kettle one final rinse with clean water. Then, leave the lid open and let it air dry completely before storing. This prevents moisture buildup and keeps mold at bay.
Alternative Cleaning Methods
While vinegar is the most popular choice, it’s not the only option. Depending on your preferences or what you have on hand, you can use other natural cleaners to keep your kettle spotless.
Lemon Juice Method
Fresh lemon juice is a great alternative to vinegar. It’s naturally acidic and leaves a pleasant citrus scent. Cut a lemon in half and squeeze the juice into the kettle, adding enough water to cover the heating element. Let it sit for 30–60 minutes, then scrub and rinse as usual. For extra power, you can boil the lemon-water mixture.
Baking Soda Paste for Stains
If your kettle has discoloration or tea stains, make a paste with baking soda and a little water. Apply it to the stained areas and let it sit for 15 minutes. Gently scrub with a soft brush, then rinse. This method is especially effective for the interior walls and spout.
Commercial Descaling Solutions
For those who prefer ready-made products, commercial descalers are convenient and effective. Follow the instructions on the label—typically, you dissolve a tablet or powder in water, let it sit, then rinse thoroughly. These solutions are formulated to be safe for kettles and often include odor-neutralizing agents.
Boiling Water with Salt
In a pinch, you can use plain water and salt. Add a tablespoon of salt to a full kettle of water, bring it to a boil, and let it cool. The salt helps loosen light mineral deposits. Scrub gently and rinse well. This method is less effective for heavy limescale but works for maintenance cleaning.
Tips for Maintaining a Clean Electric Kettle
Cleaning your kettle once isn’t enough—regular maintenance is key to keeping it in great shape. Here are some practical tips to make cleaning easier and more effective over time.
Clean Weekly
Make it a habit to clean your kettle at least once a week if you use it daily. This prevents limescale from building up and reduces the need for deep cleans. Set a reminder on your phone or calendar to stay consistent.
Use Filtered Water
If you have hard water, consider using filtered or distilled water in your kettle. This reduces mineral content and slows limescale formation. While it won’t eliminate the need for cleaning, it can significantly extend the time between descaling sessions.
Empty After Each Use
Don’t leave water sitting in the kettle overnight. Stagnant water encourages mineral buildup and can lead to odors. After each use, pour out any remaining water and leave the lid open to air dry.
Wipe the Spout and Lid
Tea and coffee residues can accumulate around the spout and under the lid. Wipe these areas with a damp cloth after each use to prevent staining and buildup.
Check the Heating Element
Periodically inspect the heating element for signs of limescale. If you see white deposits, clean them promptly. A clean heating element ensures faster boiling and energy efficiency.
Store Properly
When not in use, store your kettle with the lid open. This allows air to circulate and prevents moisture from trapping inside, which can lead to mold or mildew.
Common Mistakes to Avoid
Even with the best intentions, it’s easy to make mistakes when cleaning your electric kettle. Avoid these common pitfalls to protect your appliance and ensure effective cleaning.
Using Harsh Chemicals
Avoid bleach, ammonia, or abrasive cleaners. These can damage the interior coating, leave toxic residues, or corrode metal parts. Stick to natural, food-safe options like vinegar or lemon juice.
Submerging the Base
Never immerse the electrical base in water. Water can seep into the motor and cause permanent damage or create a safety hazard. Only clean the interior and exterior surfaces with a damp cloth.
Skipping the Rinse
Always rinse thoroughly after using vinegar or other cleaners. Residual acid can affect the taste of your drinks and, over time, damage the kettle’s interior.
Using Steel Wool
Scrubbing with steel wool or metal brushes can scratch the surface, creating grooves where bacteria and minerals can hide. Use only soft sponges or brushes.
Ignoring the Manufacturer’s Instructions
Check your kettle’s user manual for specific cleaning recommendations. Some models have special coatings or components that require gentle care.
When to Replace Your Electric Kettle
No matter how well you clean it, every electric kettle has a lifespan. Most last between 3 to 5 years with regular use. But how do you know when it’s time to replace it?
If you notice persistent odors or tastes that don’t go away after cleaning, the interior may be permanently stained or damaged. Similarly, if the kettle takes much longer to boil water or frequently trips the circuit breaker, the heating element may be failing.
Visible cracks, rust, or leaks are also signs that your kettle is nearing the end of its life. And if the automatic shut-off feature stops working, it’s a serious safety concern—replace it immediately.
When shopping for a new kettle, look for models with removable lids, easy-to-clean interiors, and descaling indicators. Stainless steel and glass kettles are generally easier to maintain than plastic ones.
Conclusion
Keeping your electric kettle clean is one of the simplest ways to improve your daily routine. Not only does it ensure better-tasting beverages, but it also extends the life of your appliance and saves energy. With just a few minutes of effort each week, you can prevent limescale, odors, and performance issues.
Remember: clean regularly, use natural cleaners, rinse thoroughly, and avoid common mistakes. Whether you prefer vinegar, lemon, or a commercial descaler, the key is consistency. Your kettle—and your taste buds—will thank you.
By following the steps and tips in this guide, you’ll keep your electric kettle in peak condition for years to come. So go ahead, boil that water, and enjoy your next cup of tea with confidence.
Frequently Asked Questions
How often should I clean my electric kettle?
Clean your electric kettle at least once a week if you use it daily. If you have hard water, increase cleaning to every 1–2 weeks to prevent heavy limescale buildup.
Can I use bleach to clean my electric kettle?
No, avoid bleach and other harsh chemicals. They can damage the interior, leave toxic residues, and affect the taste of your drinks. Stick to vinegar, lemon juice, or baking soda.
Is it safe to boil vinegar in my kettle?
Yes, boiling vinegar is generally safe and effective for descaling. However, it produces a strong smell, so ensure good ventilation or skip this step if you’re sensitive to odors.
Can I clean the base of my electric kettle?
No, never submerge the electrical base in water. Wipe the exterior with a damp cloth, but keep water away from the cord, plug, and motor.
Why does my kettle smell after cleaning?
The smell is usually from vinegar residue. Rinse the kettle thoroughly with clean water, or use a baking soda solution to neutralize odors.
What if my kettle has a plastic interior?
Plastic kettles can absorb odors and stains more easily. Clean them regularly with vinegar or lemon juice, and avoid strong-smelling cleaners. Consider switching to stainless steel or glass for easier maintenance.