Is your electric kettle acting up? Don’t rush to replace it just yet—many common issues can be fixed at home with a few simple steps. From heating problems to strange noises, this guide walks you through practical solutions to get your kettle working like new again.
Key Takeaways
- Descaling regularly prevents mineral buildup: Hard water leaves limescale that can clog heating elements and reduce efficiency.
- Check the power source first: Often, the issue isn’t the kettle—it’s the outlet, cord, or fuse.
- Inspect the heating element for damage: Burnt or corroded elements may need cleaning or replacement.
- Test the thermostat and safety switch: These components control heating and shut-off; failure means no hot water.
- Clean the lid and spout to prevent blockages: Residue and debris can interfere with steam release and water flow.
- Know when to replace instead of repair: If the kettle is old or damaged beyond simple fixes, replacement is safer and more cost-effective.
- Always unplug before troubleshooting: Safety comes first—never work on an electric kettle while it’s plugged in.
📑 Table of Contents
- Introduction: Why Your Electric Kettle Might Be Failing
- Common Electric Kettle Problems and What They Mean
- Step-by-Step Guide to Diagnosing Your Kettle
- How to Fix a Electric Kettle: Practical Repair Solutions
- Preventative Maintenance to Avoid Future Problems
- When to Replace Instead of Repair
- Conclusion: Keep Your Kettle Boiling for Years
Introduction: Why Your Electric Kettle Might Be Failing
Electric kettles are one of the most convenient kitchen appliances we rely on daily. Whether it’s for morning coffee, instant noodles, or a soothing cup of tea, a working kettle is essential. But when it stops heating, makes odd noises, or won’t turn on at all, it can throw your whole routine off balance. The good news? Many common electric kettle problems aren’t as serious as they seem—and most can be fixed without calling a technician or buying a new one.
Before you toss your kettle in the recycling bin, take a deep breath. With a little patience and the right approach, you can often restore it to full functionality. This guide will walk you through the most frequent issues, how to diagnose them, and step-by-step solutions you can try at home. We’ll cover everything from simple cleaning to checking internal components, all while keeping safety in mind.
Common Electric Kettle Problems and What They Mean
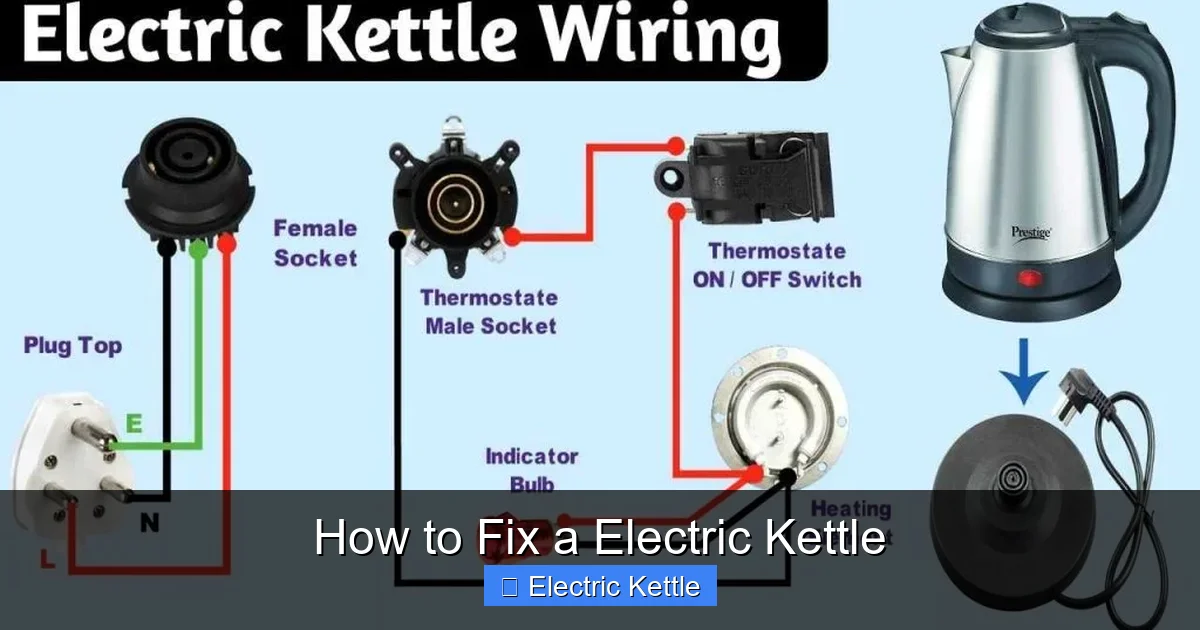
Visual guide about How to Fix a Electric Kettle
Image source: kitchenadvising.com
Understanding the symptoms is the first step in learning how to fix a electric kettle. Not every issue requires a full disassembly or part replacement. Often, the problem is minor and easily resolved with basic maintenance. Let’s look at the most common complaints and what they typically indicate.
Kettle Won’t Turn On
If your kettle doesn’t respond when you press the switch, the issue could be as simple as a loose power cord or a tripped circuit. Start by checking if the outlet is working—try plugging in another device to confirm. If the outlet is fine, inspect the kettle’s power cord for fraying or damage. A broken cord may need replacement, but if it looks intact, the problem might be internal, such as a blown fuse or faulty switch.
Water Doesn’t Heat Up
This is one of the most frustrating issues. You fill the kettle, press the button, and nothing happens—no heat, no boiling. This usually points to a problem with the heating element or thermostat. Mineral buildup from hard water can coat the element, preventing it from transferring heat efficiently. In other cases, the thermostat may have failed and isn’t signaling the element to heat.
Kettle Turns Off Too Soon
If your kettle shuts off before the water boils, the thermostat might be malfunctioning. Thermostats are designed to detect steam and temperature, triggering the shut-off mechanism once boiling is reached. If it’s overly sensitive or damaged, it may cut power prematurely. This can also happen if the steam vent is blocked, preventing proper pressure buildup.
Strange Noises or Smells
A loud buzzing, popping, or sizzling sound during heating could mean the element is struggling due to scale buildup. A burning smell, especially when first used after cleaning, might just be residue from manufacturing or cleaning agents. However, a persistent burnt odor could indicate electrical damage or overheating—stop using the kettle immediately and inspect it.
Leaking Water
Leaks usually come from worn seals, cracks in the body, or a damaged spout. If water drips from the base, the issue might be a cracked internal tank or a faulty seal around the heating element. Leaks are serious because they pose a shock hazard. Never use a leaking kettle—disassemble and inspect or replace it.
Step-by-Step Guide to Diagnosing Your Kettle
Now that you know the common problems, let’s dive into how to fix a electric kettle by diagnosing the issue correctly. Rushing into repairs without understanding the root cause can lead to wasted time or further damage. Follow this systematic approach to pinpoint the problem.
Step 1: Unplug and Inspect the Exterior
Safety first. Always unplug the kettle before doing any inspection or repair. Look for visible signs of damage: cracks, burns, frayed cords, or loose parts. Check the base and lid for warping or discoloration. If the kettle has been dropped or exposed to high heat, internal components may be compromised.
Step 2: Test the Power Source
Plug the kettle into a different outlet to rule out a faulty socket. If it works elsewhere, the original outlet may need repair. Also, check if other appliances on the same circuit are working—this helps identify tripped breakers or blown fuses in your home’s electrical panel.
Step 3: Check the Power Cord and Plug
Gently wiggle the cord near the plug and the kettle base. If the kettle flickers on and off, there may be a loose connection. Look for scorch marks or melted plastic, which indicate overheating. A damaged cord should be replaced by a professional or with a manufacturer-approved part.
Step 4: Examine the On/Off Switch
Press the switch several times. Does it click firmly? Does it stay depressed? A sticky or unresponsive switch may need cleaning or replacement. Sometimes, mineral deposits or debris can interfere with the mechanism. Use a cotton swab dipped in vinegar to clean around the switch.
Step 5: Look Inside the Kettle
Remove the lid and shine a flashlight into the chamber. Check for limescale buildup, especially around the heating element. White, chalky deposits are a clear sign of hard water residue. Also, inspect the element for discoloration, pitting, or corrosion—these can reduce heating efficiency.
Step 6: Test the Heating Element
If you’re comfortable with basic electronics, you can use a multimeter to test the heating element for continuity. Set the multimeter to ohms (Ω) and touch the probes to the element’s terminals. A reading close to zero means the element is working; infinite resistance means it’s broken and needs replacement.
How to Fix a Electric Kettle: Practical Repair Solutions
Once you’ve identified the likely cause, it’s time to take action. Below are detailed, step-by-step solutions for the most common electric kettle issues. Remember: always unplug the kettle before starting any repair.
Fixing a Kettle That Won’t Heat: Descaling and Cleaning
Mineral buildup is the number one reason kettles lose heating power. Over time, calcium and magnesium in hard water form a thick layer on the heating element, acting as an insulator. This forces the element to work harder, overheat, and eventually fail.
To fix this, descale your kettle regularly—ideally every 1–2 months if you live in a hard water area.
Method 1: Vinegar Descaling
Fill the kettle halfway with equal parts white vinegar and water. Let it sit for at least 1 hour (or overnight for heavy buildup). Then, bring the solution to a boil, let it cool, and rinse thoroughly. Repeat if necessary. Vinegar dissolves limescale safely and effectively.
Method 2: Lemon Juice Descaling
Cut a lemon in half and squeeze the juice into the kettle. Add water to cover the element, let it sit for 30 minutes, then boil and rinse. Lemon is a natural acid and leaves a fresh scent.
Method 3: Commercial Descaler
Use a store-bought descaling solution following the package instructions. These are often more concentrated and work faster, but be sure to rinse well to avoid chemical taste.
After descaling, run the kettle 2–3 times with clean water to flush out any residue.
Repairing a Faulty On/Off Switch
If the switch feels loose, sticky, or unresponsive, it may be dirty or worn out. In some models, the switch is accessible by removing the handle or base panel.
Step 1: Unplug the kettle and remove the base (usually held by screws).
Step 2: Locate the switch mechanism. Clean it with a cotton swab dipped in isopropyl alcohol.
Step 3: Check for loose wires or burnt contacts. Re-solder if necessary (only if you’re experienced).
Step 4: Reassemble and test.
If the switch is damaged beyond cleaning, order a replacement part from the manufacturer. Avoid using the kettle with a faulty switch—it can cause overheating or electrical hazards.
Replacing a Broken Heating Element
Some kettles have removable heating elements, while others are sealed units. If your kettle has a removable element, you may be able to replace it.
Step 1: Unplug and disassemble the kettle to access the element.
Step 2: Disconnect the wires (take a photo first for reference).
Step 3: Remove the old element and install the new one.
Step 4: Reconnect wires and reassemble.
Note: Many modern kettles have sealed heating elements fused to the base. In these cases, replacing the entire base unit is often more practical than trying to repair the element.
Fixing a Malfunctioning Thermostat
The thermostat controls when the kettle turns on and off. If it’s faulty, the kettle may not heat at all or shut off too early.
Testing the thermostat requires a multimeter. Set it to continuity mode and touch the probes to the thermostat terminals. If there’s no beep or reading, the thermostat is likely dead.
Replacement thermostats are available online or from appliance parts stores. Installation varies by model, so consult your user manual or look up a video guide for your specific kettle.
Addressing Leaks and Seal Damage
Leaks are serious and should be addressed immediately. First, identify where the leak is coming from.
If water leaks from the spout: Check the spout gasket or seal. Remove it, clean it, and reinsert. If it’s cracked or brittle, replace it.
If water leaks from the base: This could mean a cracked internal tank or a damaged seal around the heating element. Unfortunately, most kettles aren’t designed to be repaired at this level. If the tank is cracked, replacement is usually the safest option.
For minor seal issues, food-grade silicone sealant can be used as a temporary fix—but only if the kettle is unplugged and fully dry. Never use sealant near electrical components.
Preventative Maintenance to Avoid Future Problems
The best way to fix a electric kettle is to prevent problems from happening in the first place. Regular maintenance can extend the life of your kettle and keep it running efficiently.
Descale Monthly
Even if you don’t notice scale, it builds up over time. Make descaling a monthly habit, especially if you use your kettle daily. This simple step can prevent 80% of heating issues.
Use Filtered Water
Filtered or distilled water reduces mineral content, slowing down limescale formation. It also improves the taste of your beverages.
Empty After Use
Don’t leave water sitting in the kettle overnight. Stagnant water encourages bacterial growth and accelerates scale buildup. Empty and dry the kettle after each use.
Clean the Exterior and Lid
Wipe the outside with a damp cloth and mild detergent. Clean the lid and steam vent with a soft brush to prevent clogs. A blocked vent can cause pressure issues and premature shut-off.
Store Properly
Keep the kettle in a dry, cool place. Avoid stacking heavy items on top, which can damage the base or lid.
Inspect Regularly
Every few months, check the cord, plug, and base for signs of wear. Early detection can prevent bigger problems.
When to Replace Instead of Repair
While many issues can be fixed, there comes a point when repair isn’t worth the effort or cost. Here’s when it’s time to retire your kettle.
Age and Wear
If your kettle is over 5–7 years old and showing multiple signs of failure, replacement is often more economical. Newer models are more energy-efficient and come with better safety features.
Cracked or Warped Body
Plastic kettles can warp from repeated heating, especially if overfilled. Metal kettles may develop cracks. These structural issues can’t be safely repaired.
Electrical Damage
Burn marks, melted plastic, or a burnt smell indicate serious electrical problems. These pose fire and shock risks. Do not attempt to repair—replace immediately.
Sealed Unit with Failed Element
If your kettle has a sealed heating element and it fails, replacement is usually the only safe option. Trying to repair it can void warranties and create hazards.
Cost of Parts vs. New Kettle
If replacement parts cost more than half the price of a new kettle, it’s smarter to upgrade. Look for energy-efficient models with auto shut-off, boil-dry protection, and removable filters.
Conclusion: Keep Your Kettle Boiling for Years
Learning how to fix a electric kettle isn’t just about saving money—it’s about understanding your appliances and extending their useful life. With regular maintenance and a little troubleshooting know-how, you can keep your kettle working reliably for years.
From descaling to checking the thermostat, most common issues have simple solutions. Always prioritize safety: unplug before inspecting, avoid water near electrical parts, and know your limits. When in doubt, consult a professional or consider a replacement.
Your electric kettle is more than just a convenience—it’s a daily companion. Treat it well, and it will keep serving you hot water, one perfect cup at a time.
Frequently Asked Questions
Can I fix a electric kettle that won’t turn on?
Yes, in many cases. Start by checking the power outlet, cord, and fuse. If those are fine, the issue may be a faulty switch or internal wiring. Test with a multimeter if you’re comfortable, or consult a technician.
How often should I descale my electric kettle?
Descale every 1–2 months if you use your kettle daily and have hard water. If you use filtered water or less frequently, every 3–4 months is sufficient.
Is it safe to use vinegar to clean my kettle?
Yes, white vinegar is safe and effective for descaling. Just rinse thoroughly after use to avoid any vinegar taste in your drinks.
Why does my kettle make a buzzing noise?
Buzzing often indicates limescale buildup on the heating element. Descale the kettle to restore quiet operation. If the noise persists, the element may be damaged.
Can I replace the heating element in any electric kettle?
Only if it’s a removable type. Many modern kettles have sealed elements fused to the base, making replacement difficult or impossible without professional help.
What should I do if my kettle leaks water?
Stop using it immediately. Leaks can cause electrical shocks. Inspect the seals and spout. If the internal tank is cracked, replacement is usually the safest option.