Discover easy, step-by-step methods to repair electric kettle at home without calling a technician. From fixing heating problems to replacing faulty switches, this guide covers everything you need to know to restore your kettle’s performance safely and affordably.
Key Takeaways
- Safety first: Always unplug the kettle and let it cool completely before attempting any repair.
- Common issues: Most electric kettle problems stem from limescale buildup, faulty thermostats, or damaged heating elements.
- DIY cleaning: Regular descaling with vinegar or citric acid can prevent many heating issues.
- Tools needed: A multimeter, screwdrivers, and replacement parts like thermostats or fuses are often sufficient for basic repairs.
- When to replace: If the heating element is cracked or the kettle leaks, replacement may be safer than repair.
- Warranty check: Always verify if your kettle is under warranty before opening it, as DIY repairs may void coverage.
- Preventive care: Using filtered water and regular cleaning extends your kettle’s lifespan significantly.
📑 Table of Contents
- Introduction: Why Repairing Your Electric Kettle at Home Makes Sense
- Understanding How an Electric Kettle Works
- Common Electric Kettle Problems and Their Causes
- Essential Tools and Safety Precautions
- Step-by-Step Guide: How to Repair Electric Kettle at Home
- Preventive Maintenance: Keeping Your Kettle in Top Shape
- When to Replace Instead of Repair
- Conclusion: Empower Yourself with DIY Kettle Repair
Introduction: Why Repairing Your Electric Kettle at Home Makes Sense
We’ve all been there—rushing to make morning coffee, only to find your electric kettle isn’t heating up. Instead of tossing it in the trash or calling a repair service, consider this: many common electric kettle issues can be fixed at home with a few basic tools and a little know-how. Learning how to repair electric kettle at home not only saves money but also reduces electronic waste and gives you a sense of accomplishment.
Electric kettles are among the most used appliances in modern kitchens. They’re fast, efficient, and convenient—until they stop working. But before you assume it’s time for a replacement, take a closer look. Often, the problem is something simple like mineral buildup, a tripped thermostat, or a loose connection. With the right approach, you can diagnose and fix these issues yourself, often in under an hour.
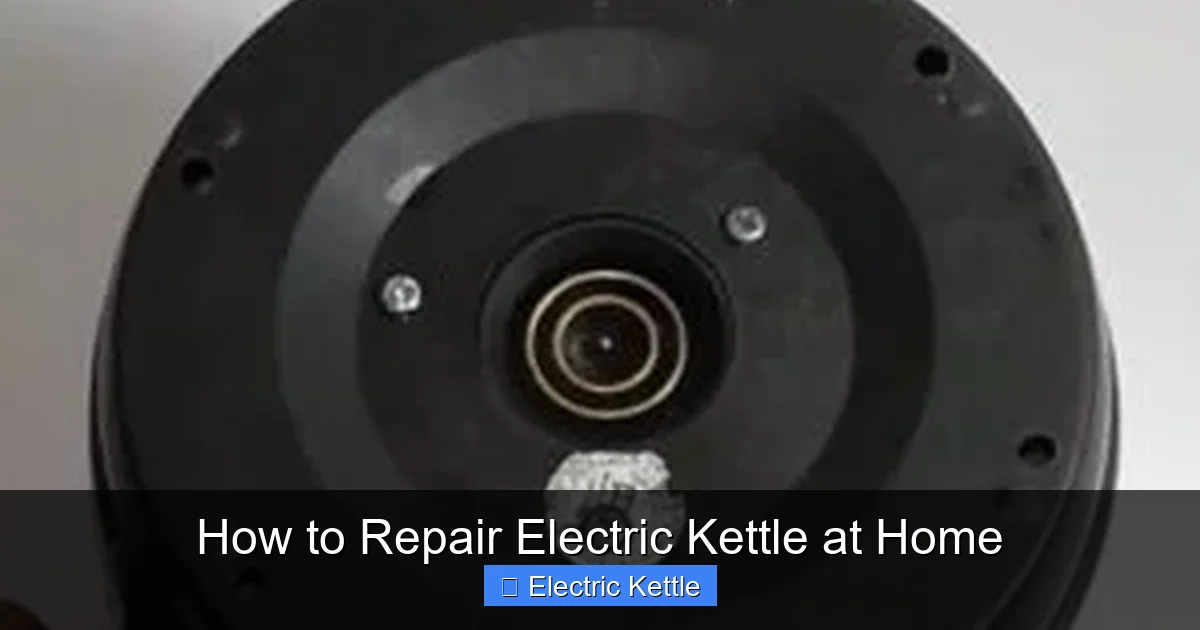
Understanding How an Electric Kettle Works
Before diving into repairs, it helps to understand the basic components and how they work together. Most electric kettles operate on a simple principle: electricity flows through a heating element at the base, which heats the water inside the chamber. A thermostat monitors the temperature and cuts off power once the water reaches boiling point. Once the water cools slightly, the thermostat may allow reheating if the kettle has a keep-warm function.
Visual guide about How to Repair Electric Kettle at Home
Image source: maintenanceskill.com
Key Components of an Electric Kettle
- Heating Element: Usually a concealed coil or plate at the bottom that gets hot when electricity passes through it.
- Thermostat: A temperature-sensitive switch that turns the heating element on and off to maintain boiling temperature.
- Thermal Fuse: A safety device that cuts power permanently if the kettle overheats, preventing fire hazards.
- Power Base and Cord: Transfers electricity from the outlet to the kettle via a rotating connector.
- Lid and Handle: Often include microswitches that prevent operation when the lid is open.
- Water Level Sensor (in some models): Prevents dry boiling by cutting power if water is too low.
Knowing these parts helps you pinpoint where a problem might originate. For example, if the kettle doesn’t heat at all, the issue could be with the power supply, the heating element, or the thermostat. If it heats but doesn’t turn off, the thermostat is likely faulty.
Common Electric Kettle Problems and Their Causes
Most electric kettle malfunctions fall into a few common categories. Identifying the symptom is the first step toward a successful repair. Here are the most frequent issues and what typically causes them.
Kettle Doesn’t Heat Up
This is the most common complaint. If your kettle isn’t heating, check these potential causes:
- No power supply: Ensure the kettle is properly seated on the base and the outlet is working. Try plugging another device into the same socket.
- Faulty power cord or base connector: Over time, the rotating connector between the kettle and base can wear out, leading to poor contact.
- Blown thermal fuse: This one-time-use safety device may have tripped due to overheating. It cannot be reset and must be replaced.
- Defective heating element: If the element is cracked or corroded, it won’t heat. This often requires replacement.
Kettle Turns Off Before Water Boils
If your kettle shuts off too early, it’s likely a thermostat issue. The thermostat may be misaligned, dirty, or worn out. In some cases, limescale buildup around the thermostat sensor can interfere with temperature readings, causing premature shutdown.
Kettle Leaks Water
Leaks usually indicate a cracked interior chamber, a damaged seal around the heating element, or a faulty lid gasket. If the leak is near the base, the heating element seal may need replacing. If it’s from the spout or lid, check for cracks or worn gaskets.
Kettle Makes Strange Noises
Bubbling, popping, or rattling sounds can result from limescale buildup on the heating element. As water heats, trapped air in the scale expands and creates noise. In rare cases, a loose internal component may cause rattling.
Kettle Smells Burnt or Smoky
A burning smell often means the thermal fuse has blown or the heating element is overheating due to dry boiling. Never operate a kettle without water—this can damage components and create fire risks.
Essential Tools and Safety Precautions
Repairing an electric kettle at home is generally safe if you follow basic precautions. However, electricity and water don’t mix, so safety is paramount.
Safety First: What You Must Do Before Starting
- Unplug the kettle: Always disconnect it from the power source before opening or inspecting.
- Let it cool completely: The heating element and water can remain hot for several minutes after use.
- Work in a dry area: Avoid damp surfaces and keep your hands dry.
- Wear safety glasses: Small parts or springs may pop out during disassembly.
- Check the warranty: Opening the kettle may void the manufacturer’s warranty. If it’s still under warranty, consider contacting the brand first.
Tools You’ll Need
Most electric kettle repairs require only a few basic tools:
- Screwdrivers: Phillips and flathead, depending on the screws used.
- Multimeter: Essential for testing continuity in fuses, thermostats, and heating elements.
- Needle-nose pliers: Useful for gripping small wires or connectors.
- Replacement parts: Common spares include thermal fuses, thermostats, and heating element seals.
- Cleaning supplies: White vinegar or citric acid for descaling, and a soft brush or cloth.
You can find replacement parts online by searching for your kettle’s model number. Many manufacturers sell genuine parts, and third-party suppliers often offer compatible alternatives at lower prices.
Step-by-Step Guide: How to Repair Electric Kettle at Home
Now that you understand the basics, let’s walk through common repair scenarios. These step-by-step instructions will help you troubleshoot and fix your kettle safely.
Step 1: Diagnose the Problem
Start by observing the symptoms. Does the kettle not heat at all? Does it shut off early? Is there a leak? Write down what you notice. Then, perform a visual inspection. Look for:
- Cracks in the body or lid
- Loose or frayed wires
- White or green deposits (signs of limescale or corrosion)
- Burnt smell or discoloration around the base
If the kettle doesn’t heat, use a multimeter to test the power cord and base connector for continuity. If there’s no power flow, the issue is likely in the cord or base.
Step 2: Clean and Descale the Kettle
Before replacing any parts, try cleaning. Limescale is a common culprit in heating issues. Here’s how to descale:
- Fill the kettle halfway with equal parts water and white vinegar (or use citric acid as directed).
- Let it sit for 1–2 hours, or boil the solution and let it sit for 30 minutes.
- Scrub the interior with a soft brush or sponge.
- Rinse thoroughly with clean water and run 1–2 cycles with fresh water to remove any vinegar taste.
After descaling, test the kettle. If it still doesn’t heat, move on to component testing.
Step 3: Test the Thermal Fuse
The thermal fuse is a small, cylindrical component usually located near the heating element. It’s designed to blow if the kettle overheats. Once blown, it must be replaced.
- Unplug the kettle and remove the base cover (usually held by 2–4 screws).
- Locate the thermal fuse—it’s often attached to the heating element with wires.
- Set your multimeter to continuity mode.
- Touch the probes to the fuse’s terminals. If there’s no beep or reading, the fuse is blown.
- Replace it with an identical fuse (check voltage and temperature ratings).
Note: Never bypass a blown thermal fuse—it’s a critical safety feature.
Step 4: Check the Thermostat
The thermostat controls when the heating element turns on and off. A faulty thermostat can cause the kettle to not heat or to shut off prematurely.
- Locate the thermostat—usually a small disc or box near the heating element.
- Disconnect the wires (take a photo first for reference).
- Use the multimeter to test for continuity. If it doesn’t show continuity when cold, it may be defective.
- Replace with a matching thermostat if needed.
Some thermostats are adjustable. If yours is, you can try cleaning the contacts with rubbing alcohol and a cotton swab.
Step 5: Inspect the Heating Element
If the heating element is damaged, it won’t heat the water. Look for cracks, corrosion, or discoloration. To test it:
- Disconnect the wires from the element.
- Set the multimeter to ohms (resistance) mode.
- Touch the probes to the element’s terminals. A working element should show low resistance (typically 20–50 ohms, depending on wattage).
- If the reading is infinite (no continuity), the element is broken and must be replaced.
Replacing a heating element can be tricky, as it’s often sealed into the base. Some kettles have removable elements, while others require full base replacement. Check your model’s service manual if available.
Step 6: Fix Leaks
If your kettle leaks, identify the source:
- Lid leak: Check the rubber gasket. Clean it or replace it if cracked.
- Spout leak: Look for cracks in the spout or loose connections.
- Base leak: This often means the heating element seal is compromised. You may need to replace the entire base or seal kit.
For minor cracks, food-safe epoxy can be a temporary fix, but replacement is safer long-term.
Preventive Maintenance: Keeping Your Kettle in Top Shape
The best way to avoid repairs is to maintain your kettle properly. A little care goes a long way in extending its life.
Regular Descaling
Hard water leaves mineral deposits that reduce efficiency and damage components. Descale your kettle every 1–2 months, or more often if you live in a hard water area. Use vinegar or a commercial descaler.
Use Filtered Water
Filtered or distilled water reduces limescale buildup and improves taste. It’s a simple change that makes a big difference.
Avoid Dry Boiling
Never turn on the kettle without water. Dry boiling can burn out the heating element and blow the thermal fuse.
Clean the Exterior
Wipe the outside with a damp cloth and mild detergent. Avoid submerging the base or cord in water.
Store Properly
Keep the kettle in a dry place with the lid open slightly to prevent moisture buildup and odors.
When to Replace Instead of Repair
While many issues can be fixed, some problems mean it’s time for a new kettle. Consider replacement if:
- The kettle is more than 5–7 years old
- The heating element is cracked or corroded beyond repair
- There’s a persistent leak that can’t be sealed
- Multiple components have failed
- The cost of parts and tools exceeds half the price of a new kettle
Safety is also a factor. If you’re unsure about a repair or don’t have the right tools, it’s better to replace the kettle than risk electrical hazards.
Conclusion: Empower Yourself with DIY Kettle Repair
Learning how to repair electric kettle at home is a practical skill that saves money, reduces waste, and gives you greater control over your appliances. With basic tools, a little patience, and attention to safety, you can fix many common issues—from limescale buildup to blown fuses—without professional help.
Remember, not every problem requires a new kettle. Often, a simple cleaning or part replacement is all it takes to restore functionality. By understanding how your kettle works and following the steps in this guide, you’ll be better equipped to troubleshoot and maintain it for years to come. So the next time your kettle acts up, don’t panic—grab your screwdriver and multimeter, and take charge of the repair yourself.
Frequently Asked Questions
Can I repair an electric kettle if it’s still under warranty?
Opening your kettle may void the warranty, so check the manufacturer’s policy first. If it’s under warranty, contact the brand for repair or replacement options instead of attempting a DIY fix.
Is it safe to use a kettle after replacing the thermal fuse?
Yes, as long as you use the correct replacement fuse with matching voltage and temperature ratings. Never bypass the fuse, as it’s a critical safety feature that prevents overheating.
How often should I descale my electric kettle?
Descale every 1–2 months if you use hard water, or every 3–4 months with soft water. Regular descaling prevents limescale buildup and keeps your kettle heating efficiently.
Why does my kettle shut off before the water boils?
This is usually caused by a faulty thermostat or limescale buildup around the temperature sensor. Clean the kettle thoroughly and test the thermostat with a multimeter.
Can I fix a cracked electric kettle body?
Small cracks in the lid or spout may be temporarily sealed with food-safe epoxy, but a cracked main body often compromises safety and insulation. Replacement is recommended.
What should I do if my kettle smells burnt?
Unplug it immediately. The smell likely means the thermal fuse blew or the heating element overheated. Inspect for damage and replace any burnt components before using again.