Cooking beans in a rice cooker is not only possible—it’s easy and efficient. This versatile kitchen tool uses steam and controlled heat to produce tender, evenly cooked beans with minimal effort. Whether you’re making chili, soups, or side dishes, your rice cooker can handle it.
Have you ever looked at a bag of dried beans and thought, “Ugh, another hour of soaking”? We’ve all been there. But what if I told you that your trusty rice cooker could turn those hard little legumes into creamy, flavorful bites in just under an hour—sometimes even less? That’s right: you can absolutely cook beans in a rice cooker, and doing so might just revolutionize the way you prepare protein-rich meals at home.
Rice cookers aren’t just for white or brown rice anymore. These countertop appliances have evolved into multitasking marvels capable of steaming vegetables, keeping food warm for hours, and yes—cooking beans from scratch. In fact, many modern models come with dedicated settings like “bean,” “steam,” or even “soup” that make legume preparation faster and more consistent than traditional stovetop methods.
In this comprehensive guide, we’ll walk you through everything you need to know about cooking beans in your rice cooker—from choosing the right type of beans to mastering water ratios and timing. You’ll also discover pro tips for enhancing flavor, avoiding common pitfalls, and repurposing leftover bean mash into delicious new dishes. By the end, you’ll never look at your rice cooker the same way again.
Key Takeaways
- Yes, beans can be cooked in a rice cooker: Most dried beans work well, including black beans, kidney beans, pinto beans, and chickpeas.
- No soaking required for some varieties: Many rice cookers have a “bean” or “steam” setting that allows direct cooking without overnight soaking.
- Proper water ratio is essential: Use 2–3 cups of water per cup of dry beans to prevent drying out or overflow.
- Cooking time varies by bean type: Black beans typically take 45–60 minutes; chickpeas may need up to 90 minutes on high settings.
- Texture control is key: Overcooking leads to mushiness—check beans periodically after the timer ends.
- Post-cooking steps matter: Let beans rest before draining or seasoning helps retain flavor and structure.
📑 Table of Contents
Why Cook Beans in a Rice Cooker?
Cooking beans on the stove requires constant attention—stirring, checking doneness, adjusting heat—and sometimes you forget they’re simmering until they start boiling over. With a rice cooker, however, the process becomes hands-off and foolproof. Once you add water and beans, the machine does the rest using precise temperature control and automated timers.
One major advantage is speed. While soaking beans overnight reduces cooking time by half, you can still cook them quickly in a rice cooker without pre-soaking. Plus, since the cooker maintains a steady simmer (or low boil), there’s no risk of burning or scorching. This consistency ensures that each bean cooks uniformly, resulting in a better texture overall.
Another benefit is energy efficiency. A rice cooker uses less power than an electric stove burner, making it ideal for small kitchens or eco-conscious cooks. And because the lid traps steam, moisture stays locked inside—keeping beans tender instead of drying them out like some stovetop techniques can.
What Types of Beans Work Best?
Not all beans behave the same in a rice cooker, so it’s helpful to know which ones shine brightest in this setup.
Dried Whole Beans
Beans like black beans, navy beans, lima beans, and adzuki beans are excellent candidates. Their dense structure holds up well during long cook times, and they develop rich flavors when cooked slowly. Black beans, for instance, become soft yet distinctively chewy—perfect for salads or dips.
Dried Split Peas
While technically pulses rather than true legumes, split peas also work great in rice cookers. They break down into a thick, velvety consistency, ideal for soups and stews. Just be careful not to overcook them, as they can turn into puree easily.
Chickpeas (Garbanzo Beans)
These Mediterranean favorites require longer cooking times but reward patience with a firm-yet-creamy interior. Chickpeas are fantastic in hummus, curries, or roasted snacks.
Kidney, Pinto, and Cannellini Beans
All three are commonly used in Mexican and Italian cuisines and cook beautifully in rice cookers. They maintain their shape reasonably well even after extended heating, making them reliable for casseroles and bean salads.
Avoid using canned beans in the rice cooker—they’re already cooked and will just sit in liquid, losing texture and potentially creating a slimy mess. Save canned beans for recipes where you want quick, ready-to-use legumes.
Step-by-Step Guide: How to Cook Beans in a Rice Cooker
Ready to try it yourself? Follow these simple steps for foolproof results every time.
1. Measure Your Ingredients Accurately
For every 1 cup of dried beans, use between 2½ to 3 cups of water. Too little water risks drying out the beans; too much dilutes flavor. If your rice cooker has a measuring cup included, use that—it’s designed for optimal ratios.
2. Rinse and Sort the Beans
Place beans in a fine-mesh strainer and rinse under cool running water. Pick out any debris, shriveled pieces, or stones. This step prevents unpleasant surprises later.
3. Add Water and Beans to the Inner Pot
Pour rinsed beans and water into the non-stick inner pot of your rice cooker. Don’t fill past the max line unless your model specifically allows extra volume.
4. Select the Right Setting
If your rice cooker has a “Bean” or “Steam” function, choose that. Otherwise, use the standard “White Rice” or “Cook” mode. Some advanced models even let you customize timer durations.
5. Start Cooking
Close the lid firmly and press start. The cooker will bring the mixture to a boil, then automatically switch to keep-hot or low-simmer mode depending on design.
6. Monitor After the Timer Ends
Once the cycle completes, open the lid and gently stir the beans. If they’re still slightly firm, close the lid and let them sit for 10–15 more minutes—the residual heat will finish the job. Avoid opening the lid repeatedly, as this releases steam and slows progress.
7. Drain Excess Liquid (Optional)
Most recipes call for reserving some cooking liquid for added moisture or thickening sauces. If you don’t need it, drain beans through a colander and discard the liquid.
8. Season and Serve Immediately
Toss beans with salt, herbs, spices, or olive oil right away. Delayed seasoning can cause them to absorb too much sodium or lose brightness.
Tips for Perfectly Tender Beans Every Time
Even with the best technique, a few small adjustments can elevate your bean game significantly.
Use Fresh Beans When Possible
Old or improperly stored beans take longer to cook and may remain underdone. Check expiration dates and store dried beans in airtight containers away from light and heat.
Add Acid at the End
Tomato paste, vinegar, or lemon juice added toward the end of cooking helps break down phytic acid in beans, improving digestibility and flavor. This trick also brightens dull-tasting legumes.
Avoid Salt Until Fully Cooked
Adding salt too early draws out moisture and increases cooking time. Wait until beans are nearly done to season.
Don’t Rush High-Moisture Beans
Lima and butter beans contain more starch and tend to foam excessively. Covering the pot halfway through cooking prevents messy overflows.
Test Doneness Before Serving
Press a bean between your fingers. It should yield slightly but hold its form. Overcooked beans feel gummy and dissolve too easily.
Store Leftovers Properly
Cool cooked beans completely before refrigerating in sealed containers. They’ll keep for 5–7 days and are perfect for meal prep.
Creative Ways to Use Cooked Beans from Your Rice Cooker
Once you master the basics, the possibilities multiply.
Black Bean Soup
Simmer cooked black beans with onions, garlic, cumin, and vegetable broth. Blend half for thickness, then serve topped with avocado and cilantro.
Three-Bean Chili
Combine black, kidney, and cannellini beans with tomatoes, bell peppers, and chili powder. Simmer for 30 minutes for a hearty weeknight dinner.
Hummus Without a Blender
Mash chickpeas with tahini, garlic, lemon juice, and olive oil until smooth. Add reserved cooking liquid gradually until desired spreadability.
Bean Salad
Toss cooled beans with corn, cherry tomatoes, red onion, and lime vinaigrette for a fresh, protein-packed side dish.
Burrito Bowl Base
Layer seasoned pinto beans over brown rice with salsa, cheese, and sour cream for customizable, restaurant-style bowls.
Energy Balls
Blend oats, dates, peanut butter, and mashed black beans into no-bake bars packed with fiber and plant-based protein.
Troubleshooting Common Issues
Despite their simplicity, rice cookers aren’t immune to mistakes—but most problems have easy fixes.
Beans Are Still Hard After Full Cook Time
This usually means insufficient water or old beans. Try increasing water by half next time, or soak beans for 4 hours beforehand if using hard varieties like adzuki.
Beans Are Mushy or Falling Apart
Overcooking causes disintegration. Next batch, reduce cook time by 10 minutes and check texture sooner. Also, avoid stirring too vigorously while hot.
Foam Builds Up During Cooking
Natural starches in beans create foam. Skim off excess with a spoon, or add a teaspoon of oil to the water to suppress bubbling.
Water Evaporates Too Quickly
Check the sealing gasket around the lid. Worn-out rubber rings allow steam escape, lowering internal pressure and extending cook times.
Rice Cooker Smells Like Burnt Beans
Dry-out occurs when the bottom layer sticks. Always ensure enough water, and consider lining the pot with parchment paper for easier cleanup.
Lid Won’t Seal Properly
Clean both sides of the lid thoroughly. Mineral deposits or food residue can prevent tight closure, affecting performance.
Frequently Asked Questions
Can I cook canned beans in a rice cooker?
No, it’s not recommended. Canned beans are already cooked and adding them to liquid would result in mushy, overprocessed texture. Reserve canned beans for recipes requiring quick assembly.

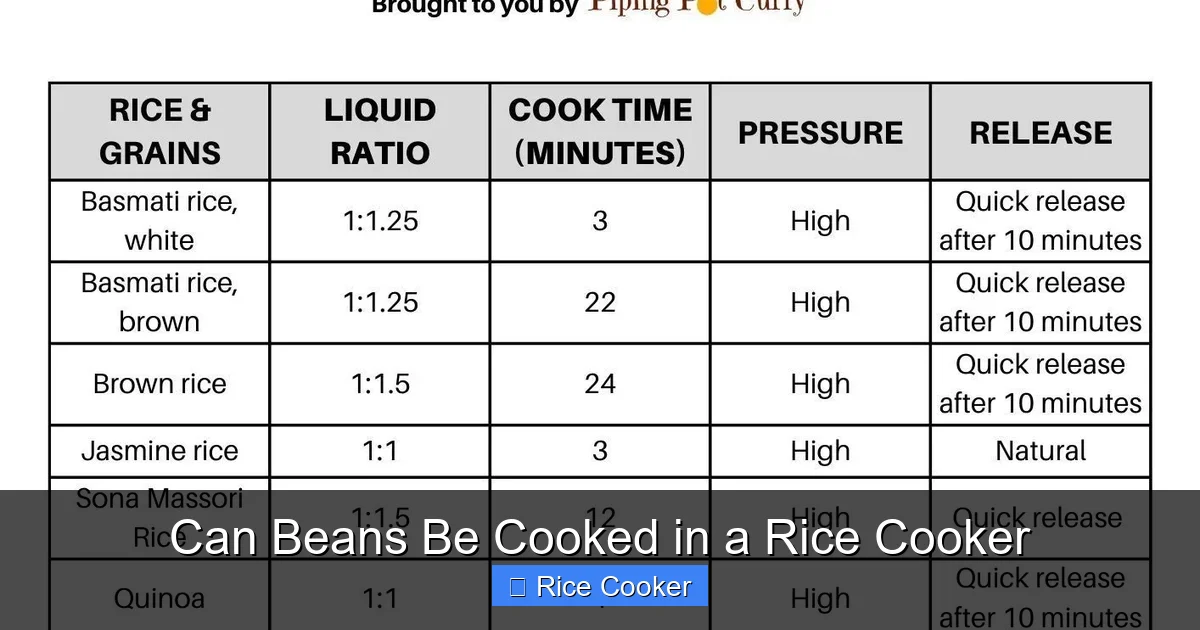
Visual guide about Can Beans Be Cooked in a Rice Cooker
Image source: apeachyplate.com
Do I need to soak beans before cooking them in a rice cooker?
Not always. Many rice cookers with high-pressure or extended timer functions can cook beans without soaking. However, soaking for 4–8 hours significantly shortens active cook time and improves tenderness, especially for older or harder bean types.
How do I prevent beans from sticking to the bottom of my rice cooker?
Use plenty of water (at least 3 cups per 1 cup of beans) and avoid opening the lid frequently. If sticking occurs, let the pot cool slightly before washing—never scrape hot ceramic or nonstick surfaces aggressively.
Can I cook multiple types of beans together in one batch?
Generally, no. Different beans have varying cook times—black beans finish in 45 minutes, while chickpeas take nearly two hours. Cooking them together risks one being underdone or the other ruined.
Is it safe to leave beans cooking unattended overnight?
Yes, if your rice cooker has a reliable keep-warm function and proper insulation. Just ensure the beans reach full boil initially and monitor the first 15 minutes to confirm the cycle behaves as expected.
Can I freeze cooked beans made in a rice cooker?
Absolutely. Cool beans completely, portion them into freezer-safe bags or containers, and label with dates. They’ll stay fresh for up to 6 months and reheat beautifully in soups or stews.
Conclusion
Cooking beans in a rice cooker isn’t just convenient—it’s transformative. It demystifies legume prep, saves time, reduces cleanup, and opens doors to countless plant-based meals. Whether you’re feeding a family, meal-prepping for the week, or simply craving a bowl of black beans with extra flavor, your rice cooker is now your secret weapon.
Remember: success hinges on water ratios, patience, and knowing your beans. Experiment with seasonings, pairings, and textures until you find your favorite routine. And don’t hesitate to repurpose leftovers—beans are incredibly flexible once they’re perfectly cooked.
So go ahead. Grab that bag of dried beans, fire up your rice cooker, and discover a whole new dimension of kitchen ease. You might just wonder why you waited so long to give it a try.
Frequently Asked Questions
Can I cook canned beans in a rice cooker?
No, it’s not recommended. Canned beans are already cooked and adding them to liquid would result in mushy, overprocessed texture. Reserve canned beans for recipes requiring quick assembly.
Do I need to soak beans before cooking them in a rice cooker?
Not always. Many rice cookers with high-pressure or extended timer functions can cook beans without soaking. However, soaking for 4–8 hours significantly shortens active cook time and improves tenderness, especially for older or harder bean types.
How do I prevent beans from sticking to the bottom of my rice cooker?
Use plenty of water (at least 3 cups per 1 cup of beans) and avoid opening the lid frequently. If sticking occurs, let the pot cool slightly before washing—never scrape hot ceramic or nonstick surfaces aggressively.
Can I cook multiple types of beans together in one batch?
Generally, no. Different beans have varying cook times—black beans finish in 45 minutes, while chickpeas take nearly two hours. Cooking them together risks one being underdone or the other ruined.
Is it safe to leave beans cooking unattended overnight?
Yes, if your rice cooker has a reliable keep-warm function and proper insulation. Just ensure the beans reach full boil initially and monitor the first 15 minutes to confirm the cycle behaves as expected.
Can I freeze cooked beans made in a rice cooker?
Absolutely. Cool beans completely, portion them into freezer-safe bags or containers, and label with dates. They’ll stay fresh for up to 6 months and reheat beautifully in soups or stews.