Can you cook rice in an oven? Absolutely! Baking rice is a reliable alternative when your rice cooker is out of commission. It’s simple, hands-off, and yields fluffy results every time. With the right ratio, temperature, and timing, oven-baked rice can be just as delicious as stovetop or rice cooker versions.
Key Takeaways
- Yes, you can cook rice in an oven. It’s a reliable backup method that works well with most types of rice.
- Use the correct water-to-rice ratio. Typically 1:2 (rice to water), but adjust for your grain type.
- Preheat your oven. Most ovens should be set between 375°F and 400°F (190°C–200°C) for best results.
- Choose oven-safe cookware. A heavy-bottomed pot with a tight-fitting lid is ideal.
- Let it rest after cooking. Resting for 10 minutes helps absorb excess moisture and fluff the grains.
- Experiment with flavors. Add broth, herbs, or spices before baking for extra taste.
- Be patient. Oven cooking takes longer than a rice cooker—usually 45–60 minutes depending on rice type.
Quick Answers to Common Questions
Can I cook rice in the oven without a rice cooker?
Absolutely! The oven method works independently of your rice cooker. It uses the same principles—boiling water transforms starch—but relies on radiant heat and trapped steam instead of direct flame.
What’s the best type of pot for oven-baking rice?
A heavy-bottomed pot with a tight-sealing lid is ideal. Cast iron, stainless steel, or enameled Dutch ovens are excellent choices because they retain heat evenly and prevent scorching.
Do I need to rinse the rice before baking?
Yes, rinsing removes excess surface starch and prevents clumping. Rinse until the water runs clear, especially for white rice. This step improves texture significantly.
How long does it take to bake rice in the oven?
It depends on the grain. White rice takes about 45–50 minutes, while brown rice needs 55–65 minutes at 375°F. Always check for doneness by tasting a few grains near the end.
Can I add flavorings like garlic or herbs while baking?
Definitely! Add chopped onions, garlic cloves, bay leaves, or fresh thyme to the pot before sealing. They infuse subtle, delicious flavor into every bite.
📑 Table of Contents
- Can You Cook Rice in an Oven? Yes, and Here’s How!
- The Science Behind Oven-Cooked Rice
- Essential Tools and Ingredients
- Step-by-Step Guide to Baking Rice in the Oven
- Troubleshooting Common Issues
- Creative Ways to Serve Oven-Baked Rice
- Tips for Perfect Every Time
- Conclusion: Oven Cooking Is Your New Best Friend
Can You Cook Rice in an Oven? Yes, and Here’s How!
Have you ever been craving a warm bowl of perfectly cooked rice but realized your rice cooker isn’t working? Or maybe you’re hosting guests and need to stretch your ingredients further? Don’t panic—your oven can actually do the job just fine! While most people default to a rice cooker or stovetop for boiling rice, baking it in the oven is not only possible but also surprisingly effective. In fact, many home cooks swear by this method for its simplicity and consistent results.
Cooking rice in the oven is like making a casserole: you combine dry ingredients with liquid, cover it tightly, and let the heat slowly transform everything into something delicious. The key is understanding the right ratios, temperatures, and timing. Whether you’re using long-grain white rice, brown rice, jasmine, or basmati, the basic principles remain the same. And the great news? Once you get the hang of it, you’ll find yourself reaching for the oven more often—not just for sides, but even for main dishes that call for rice as the star.
In this article, we’ll walk you through everything you need to know about baking rice in the oven. From choosing the right pot to mastering flavor combinations, we’ve got you covered. So grab your apron, preheat that oven, and let’s turn ordinary rice into something extraordinary—no rice cooker required!
The Science Behind Oven-Cooked Rice
How Heat Transfers in the Oven
When you boil rice on the stove, water surrounds each grain and carries heat directly into the starch. But in the oven, heat comes from the air and radiates downward. This indirect method means the rice cooks more slowly and evenly. The steam builds up under the lid, creating a moist environment that softens the grains without drying them out. Because the process is gentler, oven-baked rice tends to have less stickiness and a cleaner flavor.

Visual guide about Can You Cook Rice in an Oven
Image source: expertreviewsbestricecooker.com
Why Use the Oven Instead of the Stove?
There are several advantages to baking rice in the oven. First, it frees up your stove for other dishes—perfect during busy weeknight dinners. Second, the oven maintains a steady temperature, which reduces the risk of scorching or uneven cooking. Third, once the rice is in the oven, you don’t need to stir or watch it constantly. Just set it and forget it (well, almost).
Types of Rice That Work Best
Not all rice is created equal when it comes to oven baking. Long-grain varieties like white rice, basmati, and jasmine tend to perform the best because they have a low starch content and don’t clump easily. Short-grain or sticky rice (like sushi rice) can work too, but they may require slightly less water and closer monitoring to avoid mushiness. Brown rice takes longer due to its bran layer, so plan accordingly.
Essential Tools and Ingredients
Choosing the Right Pot
You’ll need a heavy-bottomed pot with a tight-fitting lid—something similar to what you’d use for soups or stews. Cast iron, stainless steel, or enameled Dutch ovens work great. Avoid thin aluminum pots; they can warp or transfer heat unevenly. Make sure the lid seals well so steam doesn’t escape. If your lid has a vent, keep it closed during cooking.
Visual guide about Can You Cook Rice in an Oven
Image source: pastureandpearl.com
Water and Liquid Ratios
The standard ratio is 1 cup of uncooked rice to 2 cups of liquid. For plain white rice, use water. But for extra flavor, try chicken broth, vegetable stock, or even coconut milk. Brown rice usually needs a bit more liquid—about 1:2.2—and takes longer to cook. Always measure carefully; too much water makes rice soggy, too little leaves it hard and chalky.
Seasonings and Add-Ins
Before baking, consider adding aromatics like garlic cloves, bay leaves, onion slices, or fresh herbs. A pat of butter or splash of olive oil enhances richness and prevents sticking. Some chefs even toss in frozen peas or diced carrots halfway through for a one-pot meal. Just remember: if you’re adding solids, increase liquid slightly to compensate.
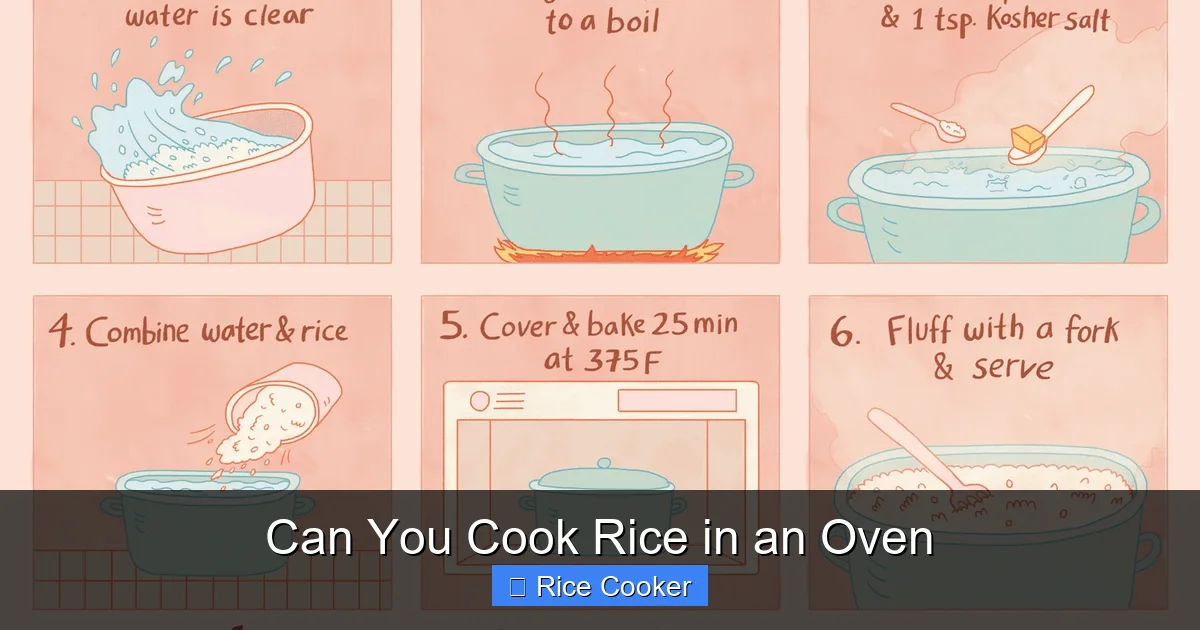
Step-by-Step Guide to Baking Rice in the Oven
Preheat Your Oven
Set your oven to 375°F (190°C). Preheating ensures the rice starts cooking at the right temperature immediately. Cold ovens lead to uneven results and extended bake times.
Rinse and Measure the Rice
Rinsing removes excess starch and prevents gummy textures. Place your rice in a strainer and rinse under cold running water until the water runs clear. Then measure both rice and liquid precisely. Use measuring cups designed for dry ingredients—not liquid ones.
Combine and Seal
Add rinsed rice, liquid, and any desired seasonings to your pot. Stir gently, then cover tightly with the lid. No need to stir again—just seal it shut.
Bake Until Tender
Place the pot in the center rack of the oven. Bake for:
- White rice: 45–50 minutes
- Brown rice: 55–65 minutes
- Jasmine or basmati: 40–45 minutes
Check after 40 minutes by piercing a grain with a fork. It should be tender but still slightly firm in the center.
Rest and Fluff
Remove from oven, but do not open the lid yet. Let it sit for 10 minutes. This allows residual steam to finish cooking the rice and firms up the texture. After resting, fluff gently with a fork before serving.
Troubleshooting Common Issues
Rice Is Too Dry
If your rice came out hard and undercooked, you likely used too little liquid or didn’t bake long enough. Next time, increase water by ¼ cup and add 5–10 minutes to bake time. Also, ensure your oven temperature is accurate—use an oven thermometer to verify.
Rice Is Too Wet or Mushy
This happens when there’s excess moisture or the lid wasn’t sealed properly. Drain off extra liquid with a fork after cooking, or spread rice on a baking sheet and return to a 200°F oven for 10 minutes to evaporate moisture.
Sticking to the Bottom
To prevent scorching, always use a bit of fat (butter, oil, or broth) and avoid stirring after combining. If rice sticks anyway, deglaze the pan with a splash of hot water or broth before covering.
Uneven Texture
Old rice or inconsistent grain sizes can cause some pieces to overcook while others stay raw. Store rice in an airtight container and buy from reputable brands. Also, try soaking rice for 30 minutes before cooking—it helps distribute heat evenly.
Creative Ways to Serve Oven-Baked Rice
Rice Bowls
Top your baked rice with grilled chicken, roasted vegetables, avocado, and a drizzle of tahini or soy sauce. It’s healthy, filling, and restaurant-quality.
One-Pot Meals
Combine rice with beans, tomatoes, cheese, and spices to make Mexican rice or Spanish paella-style dishes. The oven does all the work!
Risotto-Like Results
For creamy texture, substitute half the water with broth and stir occasionally toward the end. Finish with Parmesan and black pepper.
Rice Pudding
Use whole milk or cream instead of water, add cinnamon, vanilla, and raisins. Bake until thick and custardy—delicious for dessert.
Tips for Perfect Every Time
- Use room-temperature liquid. Cold liquid slows cooking; warm it slightly for faster results.
- Don’t peek too often. Opening the lid lets steam escape and drops temperature.
- Invest in a good lid. Silicone-rimmed lids create better seals than metal alone.
- Try different grains. Wild rice, quinoa, and barley can also be baked this way.
- Double batch for leftovers. Cool completely, refrigerate, and reheat with a splash of water to revive moisture.
Conclusion: Oven Cooking Is Your New Best Friend
So, can you cook rice in an oven? The answer is a confident yes—and now you know exactly how to do it. Whether your rice cooker breaks down, you’re preparing a large family dinner, or you simply want to expand your culinary toolkit, baking rice in the oven is a foolproof solution. It’s hands-off, energy-efficient, and delivers restaurant-quality results with minimal effort.
Remember: success comes down to consistency. Stick to the right ratios, use the proper cookware, and give your rice time to rest. Over time, you’ll develop a feel for adjustments based on your oven, altitude, and favorite grain. And once you master the basics, the possibilities are endless—from savory bowls to sweet puddings.
Next time you’re faced with a rice emergency, skip the takeout and reach for your oven instead. Not only will you save money, but you’ll also impress yourself (and maybe even your guests) with your newfound baking prowess. Happy cooking!
Frequently Asked Questions
Is oven-cooked rice healthier than stovetop?
Not necessarily—both methods preserve nutrients similarly. However, oven cooking uses no added fats, so if you’re watching calories, it can be a leaner option. Plus, you control salt and seasoning levels.
Can I bake rice in a slow cooker instead?
Yes! Set the slow cooker to high and cook for 45–60 minutes with the same water-to-rice ratio. Just ensure the lid fits snugly and monitor occasionally to prevent drying out.
Will my oven-cooked rice stick if I don’t use oil?
Slight sticking may occur, but it’s manageable. Use a small amount of broth or water to loosen stuck bits before fluffing. A non-stick pot also helps reduce adhesion.
Can I freeze leftover oven-baked rice?
Yes! Cool completely, store in airtight containers, and freeze for up to 3 months. Reheat with a splash of water in the microwave or oven to restore moisture.
Does altitude affect oven-baked rice?
At higher altitudes, water boils at a lower temperature, which can extend cooking time. Increase bake time by 5–10 minutes and ensure your oven thermometer is calibrated correctly.
What if my rice is still crunchy after baking?
Crunchy rice usually means insufficient liquid or underbaking. Next time, increase water by ¼ cup and add 5–10 minutes to the recipe. Also, avoid opening the lid during cooking.