
Yes, you can absolutely cook sushi rice in an Instant Pot, and it’s easier than you think. With the right water-to-rice ratio and a few simple steps, your Instant Pot can deliver restaurant-quality sushi rice at home. Whether you’re preparing for a dinner party or craving homemade nigiri, this method saves time without sacrificing taste or texture.
Key Takeaways
- Instant Pot is ideal for sushi rice: Its pressure-cooking function mimics traditional methods, yielding tender grains with a slightly sticky texture.
- Perfect water ratio is key: Use 1:1.15 (rice to water) for ideal consistency—slightly less water than regular white rice.
- Soaking improves texture: Let soaked rice rest for 20–30 minutes after cooking to ensure even steam absorption.
- Seasoning matters: Add vinegar, sugar, and salt while the rice is warm for authentic flavor.
- No need for a rice cooker: The Instant Pot eliminates guesswork and delivers consistent results every time.
- Cleanup is simple: A non-stick inner pot makes transferring and cleaning effortless.
- Great for meal prep: Cook large batches and store properly for fresh sushi rolls all week.
📑 Table of Contents
- Can You Cook Sushi Rice in an Instant Pot?
- Why Use an Instant Pot for Sushi Rice?
- What Makes Sushi Rice Different?
- Step-by-Step Guide: Cooking Sushi Rice in Your Instant Pot
- Troubleshooting Common Issues
- Tips for Perfect Sushi Rice Every Time
- Can You Make Other Types of Rice in the Instant Pot?
- Meal Prep with Instant Pot Sushi Rice
- Final Thoughts: Is the Instant Pot Worth It for Sushi Rice?
Can You Cook Sushi Rice in an Instant Pot?
If you’ve ever wondered whether your Instant Pot can replace your rice cooker when making sushi rice, the answer is a resounding yes. In fact, many home cooks swear by using their Instant Pot for this task—not just because it’s convenient, but because it produces rice that’s nearly indistinguishable from what you’d get in a professional kitchen. The magic lies in the pressure-cooking process, which evenly distributes heat and moisture, resulting in perfectly cooked grains every time.
Sushi rice—also known as short-grain Japanese rice—is the backbone of countless dishes like maki rolls, chirashi bowls, and onigiri. Traditionally, it’s cooked using a specific technique involving soaking, boiling, and steaming. But with modern appliances like the Instant Pot, that process becomes faster, more consistent, and surprisingly hands-off. Whether you’re a beginner or a seasoned sushi lover, learning how to make sushi rice in your Instant Pot opens up a world of culinary possibilities.
Why Use an Instant Pot for Sushi Rice?
You might be wondering why go through the trouble of adapting a recipe when a standard rice cooker already exists? Well, there are several compelling reasons to choose your Instant Pot instead.
Visual guide about Can You Cook Sushi Rice in an Instant Pot
Image source: instantpot.com
Avoid Common Mistakes
One of the biggest challenges with sushi rice is getting the water-to-rice ratio just right. Too much water leads to mushy grains; too little leaves them dry and chalky. The Instant Pot removes human error by automating pressure release and cooking time, ensuring consistent results regardless of experience level.
Save Time and Effort
Traditional sushi rice requires soaking, boiling, straining, and then seasoning—a multi-step process that can take over an hour. With the Instant Pot, you simply rinse, add water, cook under pressure, and let it naturally release. That’s under 30 minutes total!
Consistent Results Every Time
The sealed environment of the Instant Pot guarantees uniform cooking, so you won’t end up with burnt spots or undercooked kernels. This reliability makes it perfect for meal prep or entertaining guests who expect flawless sushi rice.
Multitask Like a Pro
While your rice is cooking, you can chop vegetables, marinate fish, or prepare other parts of your meal. The Instant Pot’s busy light lets you know when it’s time to focus on finishing touches—no constant monitoring required.
What Makes Sushi Rice Different?
Before diving into the Instant Pot method, it helps to understand what sets sushi rice apart from regular white rice. It’s not just about the type of grain—though short-grain Japanese rice is essential—it’s also about texture and preparation.
Visual guide about Can You Cook Sushi Rice in an Instant Pot
Image source: pressurecookrecipes.com
The Right Rice Grain
Short-grain rice has a higher starch content, which gives it that signature stickiness when cooked properly. Long-grain varieties won’t give you the same mouthfeel needed for rolling or shaping sushi.
Texture Over Flavor Alone
Sushi rice isn’t sweet or savory like pilaf or jasmine rice. Instead, its role is structural—holding together bite-sized pieces without falling apart. Achieving this requires precise control over water absorption and cooling techniques post-cooking.
Seasoning Is Part of the Process
True sushi rice is seasoned with a mixture of rice vinegar, sugar, and salt while still warm. This step enhances flavor and prevents sticking during storage or assembly.
Step-by-Step Guide: Cooking Sushi Rice in Your Instant Pot
Ready to try it yourself? Follow these clear instructions to make foolproof sushi rice using your Instant Pot. Don’t worry—it’s simpler than it sounds!
Ingredients You’ll Need
- 1 cup uncooked short-grain Japanese rice (or sushi rice blend)
- 1.15 cups cold water
- 1/4 teaspoon fine sea salt (optional, for added depth)
- Rice washer (or fine-mesh sieve)
Equipment Checklist
- Instant Pot (any model with a rice setting works)
- Measuring cup (for accurate ratios)
- Wooden spoon or rice paddle
- Plastic wrap or airtight container (for resting)
Step 1: Rinse the Rice Thoroughly
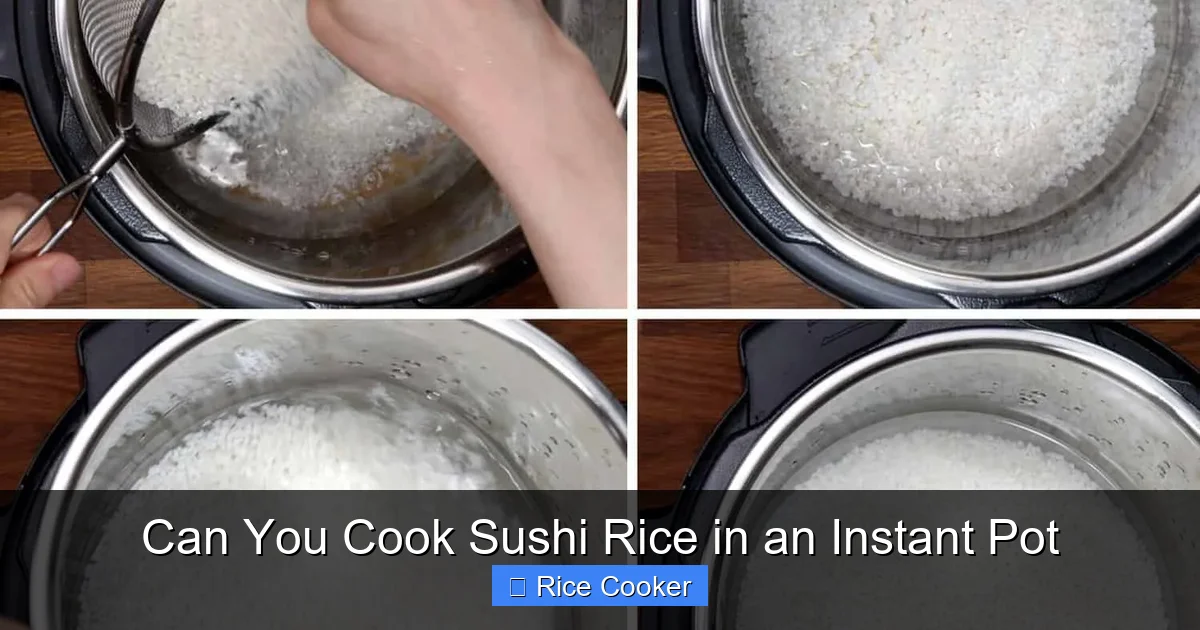
Place the rice in a fine-mesh strainer or bowl filled with cold water. Swirl gently with your fingers, then drain. Repeat until the water runs mostly clear—this removes excess starch and prevents gumminess.
Pro tip: Avoid vigorous scrubbing, as it can damage the delicate grains.
Step 2: Soak the Rice (Optional but Recommended)
Let rinsed rice sit in a bowl of room-temperature water for 20–30 minutes. Soaking allows grains to absorb moisture evenly, leading to a more balanced texture after cooking.
Step 3: Transfer to Instant Pot
Add soaked (or unsoaked) rice to the Instant Pot inner pot. Pour in 1.15 cups of cold water. If desired, sprinkle in a pinch of salt.
Note: Do not stir after adding water—this disrupts starch distribution.
Step 4: Select the “Rice” Setting
Close the lid securely, set the valve to sealing position, and press the “Manual” or “Pressure Cook” button. Set timer for 4 minutes on high pressure.
Alternative: Some models have a dedicated “Sushi Rice” mode—use that if available.
Step 5: Natural Pressure Release
Once cooking completes, allow the pressure to release naturally for 10 minutes. Then manually vent any remaining pressure with the quick-release valve.
Why natural release? It prevents sudden temperature shifts that could crack the grains.
Step 6: Fluff and Rest
Gently fluff the rice with a wooden spoon or rice paddle. Cover loosely with plastic wrap and let rest for 10–15 minutes. This final step ensures steam redistributes evenly.
Step 7: Season While Warm
In a small saucepan, combine:
- 1/4 cup rice vinegar
- 2 tablespoons sugar
- 1 teaspoon fine sea salt
Heat gently until sugar dissolves (do not boil). Pour over warm rice, folding carefully to coat without mashing. Let cool slightly before serving or shaping.
Troubleshooting Common Issues
Even with perfect technique, things don’t always go as planned. Here’s how to fix the most frequent problems.
Too Sticky or Mushy?
This usually happens when too much water is used or the rice isn’t rinsed enough. Next time, reduce water slightly (try 1.1 cups instead of 1.15) and always rinse until water clears.
Rice Sticks to the Pot
Non-stick inner pots should prevent sticking, but if yours does, try adding a tablespoon of oil or butter before cooking. Also, avoid opening the lid mid-cycle.
Gummy Texture Despite Proper Rinsing
Overcooking can cause gummy results. Stick to the 4-minute timer—longer times won’t improve texture and may worsen it.
Grains Are Separated Instead of Sticky
This suggests undercooking or insufficient soaking. Try soaking longer next time, or increase cooking time by 30 seconds only if your model supports manual adjustments.
Tips for Perfect Sushi Rice Every Time
Want to elevate your game beyond basic recipes? These pro tips will take your sushi rice from good to great.
Use Cold Water for Measuring
Hot tap water can affect rice texture due to mineral content. Always measure using cold filtered or bottled water for best results.
Don’t Skip the Resting Period
Even though the Instant Pot does much of the work, letting rice rest allows residual steam to finish hydration. Skipping this step risks uneven texture.
Season in Batches When Prepping
If making dozens of rolls, season rice in portions rather than all at once. Leftover seasoned rice can be refrigerated for up to 2 days if kept airtight.
Cool Quickly After Seasoning
After mixing in vinegar solution, spread rice on a tray or cutting board to cool rapidly. This stops overcooking and keeps grains firm.
Store Properly for Freshness
Covered sushi rice lasts 2–3 days in the fridge. Bring to room temperature before use—never microwave directly from cold without reheating gently.
Can You Make Other Types of Rice in the Instant Pot?
Absolutely! While sushi rice is a standout application, the Instant Pot shines across many rice varieties. Here’s how it compares:
Basmati & Jasmine Rice
These long-grain types benefit from shorter cook times (6–8 minutes) and require less water (1:1 ratio). They’re great for pilafs, biryanis, or fried rice.
Brown Rice
Needs longer cooking (12–15 minutes) due to bran layer. Soak beforehand for softer texture. Ideal for health-conscious meals.
Black & Red Rice
Nutrient-dense and chewy, these ancient grains take 15–20 minutes. Pair with beans or salads for hearty bowls.
Wild Rice
Cooks fastest (10–12 minutes) and adds earthy flavor to soups or side dishes.
Each type benefits from the Instant Pot’s precision, but sushi rice remains the most sensitive due to its unique texture requirements.
Meal Prep with Instant Pot Sushi Rice
Busy weeknights demand efficiency—and that’s where batch cooking comes in handy. Here’s how to maximize your Instant Pot for weekly sushi prep.
Cook Once, Eat Twice
Make a double batch (2–3 cups) on Sunday. Portion into containers, refrigerate, and use within 3 days. Perfect for weekday lunch boxes or impromptu roll nights.
Freeze for Later
Unseasoned cooked rice freezes well for up to 1 month. Thaw overnight in the fridge, then reheat gently with a splash of water to revive moisture.
Pair with Easy Fillings
Keep ingredients ready: avocado slices, cucumber sticks, pickled ginger, smoked salmon, cream cheese—all come together in minutes.
Experiment with Variations
Try adding a dash of nori powder to seasoning mix, or mix in diced apple for sweetness. Get creative without changing the base method.
Final Thoughts: Is the Instant Pot Worth It for Sushi Rice?
After mastering this method, you’ll likely never look back at your old rice cooker—at least not for sushi rice. The Instant Pot offers speed, consistency, and versatility that traditional methods simply can’t match. Plus, it frees up stovetop space and reduces cleanup time.
Of course, purists may argue that nothing beats hand-cooked rice over open flame. But for everyday home cooks, the convenience and reliability of the Instant Pot make it a worthy investment. Whether you’re feeding a family, hosting friends, or treating yourself to a DIY sushi feast, this appliance delivers.
So go ahead—grab that bag of short-grain rice, fire up your Instant Pot, and enjoy restaurant-quality results in under half an hour. Your taste buds (and dinner guests) will thank you.
Frequently Asked Questions
How much water do I use for sushi rice in an Instant Pot?
Use 1.15 cups of water per 1 cup of rice. This slightly lower ratio compared to regular rice ensures the grains stay firm yet tender.
Do I need to soak sushi rice before cooking in the Instant Pot?
Soaking is optional but recommended. It helps grains absorb water evenly, leading to better texture. Soak for 20–30 minutes before cooking.
Can I use regular white rice instead of short-grain rice?
Not ideal. Regular white rice lacks the starch needed for stickiness. Short-grain or sushi-specific rice is essential for proper texture.
How long does it take to cook sushi rice in an Instant Pot?
About 4 minutes on high pressure, followed by 10 minutes natural release and 10–15 minutes resting time.
Can I season the rice while it’s still hot in the Instant Pot?
Yes, but transfer the rice to a wide bowl first. This makes it easier to mix in vinegar-sugar-salt blend without damaging the pot.
How long will cooked sushi rice last in the refrigerator?
Up to 3 days if stored in an airtight container. Always bring to room temperature before using again.